Baked Lemon Doughnuts with Lemon Cream Cheese Glaze ~ Eggfree

Baked Lemon Donuts with Lemon Cream Cheese Glaze1


Hello folks! April went by at a lightening speed. It was a total blur. A beautiful blur at that. Yes, I absconded again for the latter part of April. Well, I hope you didn’t miss me much. Sorry to say but I didn’t miss you guys one bit. Here is why. These past days were spent with my most beautiful angelic cutie pie tiny-little-peanut-sized-newborn-niece. She turned 12 days today. We feel so blessed to have her in our lives and welcomed her in to this world with lots of snuggles and baby talks. We immediately named her Cherry (lovingly, of course!) because trust me when I tell you this, she looks just like a ruby red cherry. She is such a doll, so adorable, so so precious. All the sleepless nights spent in soothing her back to sleep were totally, absolutely worth it. I’m back home now and miss her so so much.

The moment I returned home, I had to bake. To celebrate. I instantly thought donuts! I mean, come on, donuts=celebration. Summer is not treating us Bangaloreans well this year and lemons are always on my mind. Big, plump, juicy, organic, tart yet sweet lemons from my parents-in-law’s lemon tree. They are simply THE best. So lemon donuts it was. They turned out so amazing that the next day I made them again. This time around I doubled the recipe and baked it as an 8-inch single layer cake for my parents-in-law’s wedding anniversary. So if you don’t own a donut pan, buy one ASAP! These little things are addicting! For now, simply bake them as mini cupcakes or just double this recipe to get a cake.


Baked Lemon Donuts with Lemon Cream Cheese Glaze3


The recipe is simplicity at its best. Almost refined sugar free. No eggs required. No mixer needed. Just one bowl and a whisk is all you need to make the sun shine brightest! You can even prepare the glaze in the same mixing bowl. I am always happy with less dishes and lesser clean up. So in these donuts, moisture is being imparted by buttermilk and oil. Honey shoulders the responsibility of lending sweetness. Truly ordinary ingredients create this extra-ordinary treat. These baked donuts are light, fluffy and just lemony which doesn’t make you pucker!

These donuts are then topped with lemon cream cheese glaze. The glaze is a perfect accompaniment for the donuts. Again, just lemony and just sweet. Decorate them with a sprinkle of yellow colored sanding sugar. Vibrant, just like our little one.

So celebrate life and all things nice with these lemon glazed donuts!


Baked Lemon Donuts with Lemon Cream Cheese Glaze4


Baked Lemon Doughnuts with Lemon Cream Cheese Glaze ~ Eggfree

Makes: 6 | Prep time: 15 minutes | Cook time: 10 minutes | Total: 25 minutes

Ingredients:

For donuts:
  • 3/4 cup + 2 Tbsp all-purpose flour
  • 1/4 tsp baking powder
  • 1/4 tsp baking soda
  • 1/4 tsp salt
  • 1 Tbsp white granulated sugar
  • 1 Tbsp lemon zest
  • 1/4 cup honey
  • 3 Tbsp oil
  • 1/3 cup buttermilk
  • 1/2 tsp vanilla extract
  • 2 Tbsp lemon juice (lemon enthusiasts may use 2.5 to 3 Tbsp)

For glaze:

Following measurements can glaze about 10-12 donuts.

  • 100 gm (3.5 oz) cream cheese, room temperature
  • 1 tsp lemon zest
  • 1 Tbsp lemon juice
  • 1/4 cup icing sugar, sifted
  • Yellow colored sanding sugar, to decorate

Directions:

  1.  Preheat the oven at 180ºC / 350ºF. Grease 6-count donut pan with oil. Set aside.
  2. In one bowl, whisk together flour, baking powder, baking soda and salt. Set aside.
  3. In a mixing bowl, add sugar and lemon zest and rub together with finger to release oils from the zest. Whisk in honey, oil, buttermilk, vanilla extract and lemon juice until the mixture formed is completely smooth.
  4. Slowly whisk in dry ingredients into wet ingredients until just combined. Do not overmix. Divide the batter among prepared donut pan and bake in the preheated oven for about 8-9 minutes or until a toothpick inserted in a center comes out clean. Cool in the pan on a cooling rack for 5 minutes. Then carefully turn out doughnuts directly onto rack to cool completely.
  5. Glaze: Whisk together cream cheese, lemon zest, lemon juice and sifted icing sugar to form a smooth consistency. Dip completely cooled donuts one by one into a bowl of glaze and place back on a cooling rack. Sprinkle with yellow sanding sugar just before serving as the colors will bleed. Donuts will keep in an airtight container for 2-3 days stored in a refrigerator.

*You will have little cream cheese glaze leftover which is never a bad thing in my book. You may lick with spoon or store it in refrigerator for 3-4 days. Give the glaze a good whisk before using on baked goods.
*Double the donut recipe and bake it in an 8-inch cake tin. Bake for about 20-23 minutes.
*To make this recipe vegan, make your own non-dairy buttermilk. To 1 tsp lemon juice or apple cider vinegar, add 1/3 cup non-dairy milk of your choice . Let sit for 15-20 minutes and use as a regular buttermilk substitution.


Orange Muffins

Orange Muffins


Mondays should totally begin with muffins. We all need a muffin or two to get through the day and some more to celebrate getting through the day. I hope you all agree with me here.

When I posted Sunshine Smoothie last week, I promised I’ll return with some cake to celebrate the 100th blog-post. So drum-rolls please! I’ve returned today with equally sunshiny, happy-happy orange muffins!


Orange Muffins1

These muffins are perfect to woe away your Monday blues. Eat them any time of the day. With your morning-coffee, evening-tea or as a night-time dessert accompanied by a scoop of vanilla ice-cream. It’s a real treat and your summer-stricken soul will totally thank me. You’re welcome 🙂

Moist and fluffy, these muffins are a total winner. The orange flavor shines through because I’ve used orange zest, freshly squeezed juice and just a touch of orange extract. Look at their color! Addition of yogurt makes them soft and tender. Once out from the oven and still warm, we brush the tops with honey. Warm muffins ensure that honey seeps in. This is optional but totally heavenly. And genius. So do it!


Orange Muffins2


Orange Muffins

Makes: 12 muffins | Prep time: 10 minutes | Bake time: 15 minutes approximately | Total time: 25 minutes

Ingredients:

  • 1 and 1/2 cup all purpose flour
  • 1 tsp baking powder
  • 1/2 tsp baking soda
  • 1/4 tsp salt
  • Zest from 2 oranges
  • 1/2 cup granulated white sugar
  • 1/4 cup oil
  • 2 large eggs
  • 1/2 tsp vanilla extract
  • 1/2 tsp orange extract
  • 1/3 cup plain yogurt
  • 1/3 cup freshly squeezed orange juice
  • 3 Orange slices, seeded and cut into quarters
  • 2 Tbsp honey, to brush the muffin tops (optional)
Directions:
  1. Preheat the oven at 180ºC / 350ºF. Line 12-counts muffin pan with paper liners.
  2. In a mixing bowl, whisk together flour, baking powder, baking soda and salt. Set aside.
  3. In a medium mixing bowl, place the measured white granulated sugar. Grate orange zest in the bowl and using your fingers, rub it against the sugar. Whisk in oil and eggs one by one until completely incorporated. Whisk in vanilla and orange extract.
  4. Gently whisk dry ingredients into wet ingredients in three halves alternating with yogurt and orange juice, ending with dry ingredients. Mix until *just* combined. Do not over-mix the batter.
  5. Divide the batter evenly between 12 muffin liners. Fill each liner till 3/4th mark and no more. Top each muffin with a quarter of the orange slice. Bake for 13-15 minutes or until the toothpick inserted in the center comes out clean. While muffins are still warm from the oven, brush the tops with a layer of honey. The muffins stay fresh for about 3 days stored in an airtight container.

Skinny Strawberry Chocolate Chip Muffins ~ Eggfree

Skinny Strawberry Chocolate Chip Muffins1
Skinny breakfast for your honey on Valentine’s day coming right up! It has lots of strawberries and just the right amount of dark chocolate… Match made in heaven! Indulgent yet skinny. Celebratory yet healthy. Befitting, don’t you think?
While posting these Skinny Muffins last week, I realized that I have few recipes posted here and wanted to set that right. Now that this sappy, lovey-dovey day is just round the corner, I had a perfect excuse to whip up this breakfast treat for the blog!
Skinny Strawberry Chocolate Chip Muffins3
There is nothing better than a warm muffin served with a hot mug of coffee. It gets better if served in bed! This muffin is a flavor bomb! Bits of strawberries and chocolate chips in each bite is blissful. These muffins are soft, moist and surprisingly skinny. So flavorful and fluffy. No dry crumbs in sight here.
They need very few and simple ingredients. One of the most magical ingredient of them is applesauce. Unsweetened of course. Applesauce will make sure that you don’t need to use any oil or butter! I wanted to keep the refined sugar to the minimum without making them taste cardboard-like. So I used combination of brown sugar and honey to sweeten them. I’m glad to report they were perfectly sweet!
Skinny Strawberry Chocolate Chip Muffins4,jpg
The batter comes together quickly and so easily! No mixer required. The batter is going to be quite thick but don’t worry. You will be able to scoop it easily in the muffin pan with ice-cream scoop. Do not use muffin liners as muffins may stick to the liners. I filled the muffin moulds to the brim and got 6 large muffins but you may fill them till 3/4th mark and get about 8 regular-sized muffins. Do as you please. Just make them already as they certainly don’t need an occasion! 😉
Skinny Strawberry Chocolate Chip Muffins2
Skinny Strawberry Chocolate Chip Muffins5
Skinny Strawberry Chocolate Chip Muffins ~ Eggfree
Yields: 6 large or 8 regular-sized muffins | Prep time: 15 minutes | Bake time: about 20 minutes
Ingredients:

  • 3/4 cup all-purpose flour
  • 1/2 cup whole wheat flour
  • 1/2 tsp baking soda
  • 1/2 tsp ground cinnamon
  • 2/3 cup unsweetened applesauce (I used homemade)
  • 1/4 cup brown sugar
  • 1/4 cup honey
  • 1/2 tsp vanilla extract
  • 3/4 cup diced fresh strawberries (you may use frozen berries)
  • 1/3 cup dark chocolate chips (or semi-sweet)
Directions:
  1. Preheat the oven at 180ºC/350ºF. Spray 6-count muffin pan with oil*. Set aside.
  2. In a medium mixing bowl, whisk together flours, baking soda and ground cinnamon. Set aside.
  3. In another medium bowl, whisk together applesauce, sugar, honey and vanilla extract. Add the wet ingredients to the dry until *just* combined. Fold in the strawberries and chocolate chips.
  4. Divide the batter evenly between 6 muffin cups. Bake for 16-20 minutes. Mine took exactly 18 minutes. Let them cool for about 5 minutes before releasing from pan.

*Do not use muffin liners as muffins may stick to the liners.

Note: Do not use whole wheat flour entirely as the muffins may not be turn out as soft.

Skinny Banana Blueberry Oats Muffins

Skinny Banana Blueberry Oats Muffins1
In the past week, I was just rummaging around and found out that the blog has only ONE muffin recipe posted(a great recipe but with REALLY hideous photos)! Whatt??!! How did THAT even happen? I was shocked and needed to change that pronto! Okay, I did post few skinny muffins recipes on my Facebook page before I started this blog but I haven’t been able to post them here. Of course, that is not an excuse. But you can check them out here, here and here!
I was delighted when I chanced upon these muffins on my favorite baking blog. They are skinny and totally healthy, right up my ally! Of course, they don’t taste healthy or skinny… In fact they are quite soft, moist and so dang fluffy!
Skinny Banana Blueberry Oats Muffins2
This recipe is a total bomb! It does not contain any oil or butter! Say what?!! YES… Mashed bananas and yogurt will do all the work here! Trust me, breakfast can not get better! I made quite a big batch for our small family of 2 and froze the extras and re-heated them in micro whenever the sugar cravings hit! They still tasted absolutely perfect. Instant gratification! 🙂
The recipe includes simple ingredients. Nothing fancy-schmancy! Plus, no mixer required! Takes just about 30 minutes start to finish! Such a phenomenal recipe I tell ya! The only change I made was throwing some oats for a bit of bite and texture. And of course, to make it healthier!
The batter will be quite thick so be gentle and do not over-mix, just until the flour pockets are gone. Over-mixing will result in hard and rubbery texture. Also, use super-ripe bananas for unbelievably sweet, moist and flavorful muffins. I could go on and on about them, but I’ll spare you now! Make them and see for yourself! 😉
Happy weekend you all!
Skinny Banana Blueberry Oats Muffins3
Serve warm with a knob of butter… Totally dee-vine!! 🙂
Skinny Banana Blueberry Oats Muffins
Yields: 15 muffins | Prep time: 15 minutes | Baking time: about 20 minutes
Ingredients:

  • 2 and 1/2 cup white whole wheat flour (or mix of whole wheat and all-purpose)
  • 1/2 cup oats
  • 1 tsp baking soda
  • 1/4 tsp salt
  • 1/2 tsp ground cinnamon
  • 1/4 cup honey
  • 1/2 cup light brown sugar
  • 1 cup mashed very ripe banana (2 large bananas)
  • 1/2 tsp vanilla extract
  • 1/4 cup non fat yogurt
  • 1 large egg, beaten
  • 3/4 cup milk
  • 1 and 1/4 cup fresh or frozen blueberries
Directions:
  1. Preheat the oven to 160ºC/325ºF. Spray 15 muffin tins with nonstick spray*. Set aside.
  2. In a large bowl, sift together flour, baking soda, salt and cinnamon. Toss in oats. Set aside.
  3. In a separate bowl, mix honey and brown sugar together into a thick paste. Stir in the mashed banana, yogurt, and beaten egg.
  4. Slowly pour the wet ingredients into the dry ingredients. Gently fold it together. It will be thick. Add the milk slowly and continue to gently mix the ingredients together. Gently fold in the blueberries. Do not overmix the batter or you will get tough, dry muffins.
  5. Divide the batter equally between 15 muffin tins. Fill all the way to the top. Bake for 17-19 minutes until very lightly browned on edges or a toothpick inserted in the center of the muffin comes out clean. Allow muffin to cool completely before demoulding. Muffins stay fresh stored in an airtight container at room temperature for up to 5 days. Muffins freeze well, up to 3 months.
*Do not use cupcake-liners as muffins will stick to the liners.
Recipe source: Sallys Baking Addiction

Figs & Orange Honey Mini Loaf-Cakes ~ Of course, Healthy!

Figs & Orange Honey Mini Loaf-Cakes1


I am totally in a holiday season mode.

Brace yourselves for the news I am about to break to you guys.. I brought out the planner in me(!!!) and prepared the fruit soak for my very first Christmas fruit cake 2 days back! I am definitely on top of the game. If you follow me on Instagram you already know. I can’t seem to contain my excitement. I’m counting down the days to bake and to be able to eat the final product.

I am going to let this fruit mix soak for about 3 weeks before baking into a delicious cake. This way cake will get a chance to age for about 3+ weeks before it’s Christmas! My kitchen air turned heavenly with all those fruits and citrus peels. No scented candles required.. Happy days I tell ya! 🙂

Another thing is I am baking a WHOLE lot more. I know I am not posting enough on the blog but I am baking A LOT! The weather is cold and rainy and all I want to eat at any time of the day is a piece of warm, cinnamony baked goodies. So with this awesome weather and so much baked goodies around me, all I am doing is relaxing, eating and lurking around other blogs! Can you blame me?! I mean so much holiday baking is happening everywhere!


Figs & Orange Honey Mini Loaf-Cakes2


On one fine morning, I made these gorgeous mini cakes and trust me when I tell you, they are the most moist, soft and fragrant cakes ever! One-bowl deliciousness ready in 30 minutes!

Oh, did I mention these are healthy too?!! Oh ya! This recipe is a keeper for those days when you’re eating around lots of unhealthy food on the name of celebration.

Make this quick recipe as a special breakfast treat on festival mornings or while entertaining guests and you’re sure to impress everyone!

Happy Baking! xo


Figs & Orange Honey Mini Loaf-Cakes3

Baking tray before going in the oven


Figs & Orange Honey Mini Loaf-Cakes

Yields: 6 mini loaf-cakes or 12 cupcakes | Prep time: 15 minutes | Bake time: 20 minutes approx

Ingredients:

  • 2 cups whole wheat flour
  • 1 tsp baking powder
  • 1/2 tsp baking soda
  • 1/4 tsp ground cinnamon
  • 1/4 tsp ground nutmeg
  • 1/4 tsp salt
  • 1/3 cup brown sugar
  • 2 tsp orange zest
  • 2 large eggs
  • 4 Tbsp extra-virgin olive oil
  • 1/4 cup honey
  • 1/2 cup yogurt
  • 1 tsp vanilla extract
  • 1/4 cup orange juice
  • 8-9 fresh figs, washed, stemmed

Directions:

  1. Preheat the oven to 180ºC/350ºF. Grease a 6 count mini-loaf silicone mold with baking spray. Set aside. Sift together flour, baking powder, baking soda, cinnamon, nutmeg and salt.
  2. In a medium bowl, combine sugar and orange zest, mixing with spoon to release oils from the zest. Add one egg at a time and beat until creamy, about 3-4 minutes. Add oil, honey, yogurt, vanilla, orange juice and stir to combine.
  3. Add dry ingredients to wet ingredients and stir until just combined. Do not over-mix.
  4. Cut 3 figs into quarters and cut the remaining figs into 4 slices. Fill the molds equally about 2/3rd full and submerge 2 fig quarters in each mold. Arrange 2-3 slices on top of the batter. Bake for about 16 to 18 minutes or until the cake is just firm. Do not over-bake. Allow to cool on a cooling rack for about 10 minutes. Remove from the mold and serve.

*Tastes best when served warm with the topping of Mascarpone or whipped cream, with tea/coffee.

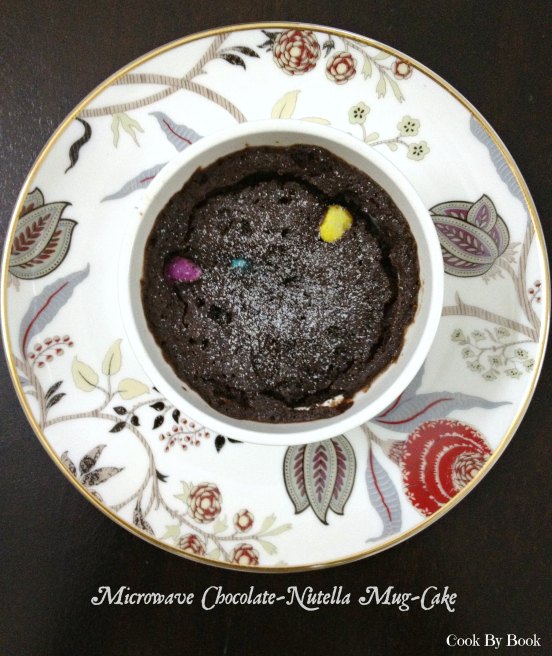
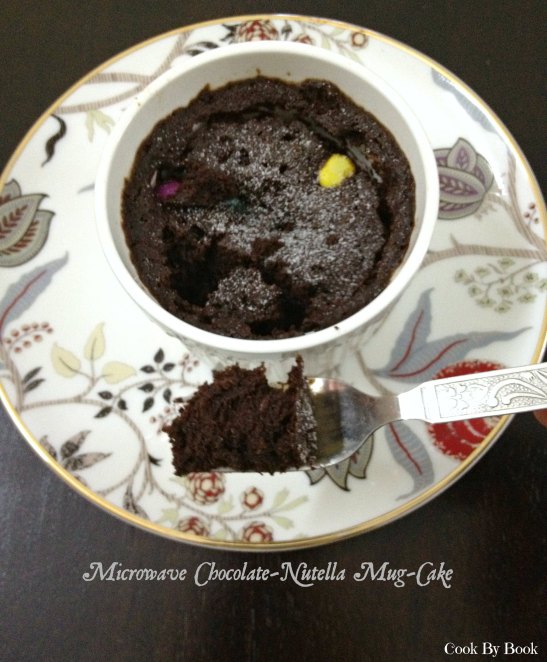
Microwave Chocolate-Nutella Mug-Cake

Microwave Chocolate-Nutella Mug-Cake1

It was a conscious decision to stay-away from this dangerous mug-cake only because of its sheer convenience. I did not need a confirmation that I can make this cake whenever chocolate-cravings hit me.

As all our resolutions come to an end sooner or later, on a particularly depressing morning, I caved in! And it definitely lifted my spirits up instantly! Yaay for broken resolutions! I’m totally hooked to this one and will be definitely trying different versions! 😛

I know there are infinite versions of mug-cakes floating on the web since 2-3 years and I did check out many of them. But I had a few things in mind about how I wanted this cake to be so I ended up making my own version of this sinful dessert. For one wanted this cake to be eggless and a wee-bit healthier so that I don’t feel too much guilty about gobbling it up.

Another criteria was a perfectly soft, moist and fluffy cake. I can’t tolerate dry crumbs. But microwave especially has a tendency to snatch away moisture and make everything dry. So timing here is a key. Do not over-cook it. Check it after 1 minute + 10 seconds. If not done then cook for another 10 to 20 seconds.

It will take you more time to assemble all the ingredients than for it to actually cook! Perfect for unusual cravings or unexpected company! It would be ready in a jiffy! For it to look more posh, make it in a fancy tea-cups/Ramekins and serve it with ice-cream or whipped cream with fresh fruits. Add anything else you want in the batter like chopped nuts, dark/white chocolate chips, butterscotch chips, dried fruits, M & Ms, sprinkles… Tini-tiny pieces of delicious surprise in every bite! Pure happiness!

Microwave Chocolate-Nutella Mug-Cake2

Mouth-watering? Read on to find out how it’s done. Be warned ~ it’s addictive!

Microwave Chocolate-Nutella Mug-Cake

Serves: 1 | Prep time: 2 minutes | Cook Time: 1 to 1 1/2 minutes

Ingredients:

  • 3 Tbsp whole wheat flour
  • 2 Tbsp powder sugar
  • 2 Tbsp unsweetened cocoa powder
  • 1/4 tsp baking soda
  • 1/4 tsp salt
  • 2 Tbsp extra-virgin olive oil
  • 3 Tbsp milk
  • 1 Tbsp Nutella
  • 1/2 tsp vanilla extract
  • M & Ms for topping or 1 Tbsp dark chocolate chips

Directions:

  1. In a medium-sized microwave-safe mug/ramekin add flour, sugar, cocoa powder, baking soda and salt. Whisk with fork until combined.
  2. Add oil, milk, Nutella, vanilla extract and mix with a fork until no lumps remain in the batter.
  3. Sprinkle top of batter with M & Ms or chocolate chips. Microwave on high for 1 to 1 1/2 minutes. Mine was done in 1 minute + 10 seconds so check at that mark and if it is not cooked through then let cook for another 10 to 20 seconds. Be careful as you don’t want a dry cake. Sprinkle with powdered sugar and serve immediately.

Peach Upside-Down Mini Cakes with Lemony Bits

Peach Upside-Down Mini Cake5

!!!Happy Father’s Day!!!

I know I am about a week early for Father’s day post but I just couldn’t stop myself from posting this scrumptious desert li’l bit early as it’s my dad’s birthday on June 9. We stay miles apart so he would not be able to taste it but that couldn’t stop me from baking something special for ‘The Most Special Man’ in my life.

My dad has been the strongest pillar for me and my sis. He is my greatest supporter, admirer and best friend. He has scolded me when he must and patted my back even at my smallest of achievements. He has taught me to ride bicycle and has held me before I fell and hurt myself. He has felt my injuries and illness more than I have suffered from them. I have been able to share anything and everything with him. He is the BEST FATHER I could have ever asked for and I thank my lucky stars everyday for it!

I will not be there to celebrate this special day along with my family but I would like to send my regards and bestest of wishes along his way. Wishing you a very very very Happy Birthday Dad! May God Almighty bless you with the best of health & may all your wishes come true!!!

My dad has been a big fan of summer fruits. As kids I remember my dad bringing bags full of peaches, plums, figs, melons and mangoes uberfresh from Farmer’s Market for us days-after-days. (Actually in case of mangoes, sacks full of it!!!) This is what turned me into biggest fruitaholic! I used to wait on summer holidays for the biggest fruit bonanza to begin so that I could keep hogging on freshest of produce!

So on his special day I decided to bake using something which bound us as a family. Our love for summer fruits being one of it! I bring to you a very simple yet decadent ‘Peach Upside-Down Mini Cakes with Lemony Bits’

Be sure to bake this for Father’s Day to make your dad feel extra-special!
Its not extravagant but will surely please your dad!

Peach Upside-Down Mini Cakes with Lemony Bits

Yields: 4 mini cakes

Ingredients:

  • 1/4 cup softened unsalted butter, divided
  • 1/4 cup light brown sugar
  • 3 medium peaches, peeled, cored and diced
  • Lemon zest of 2 lemons
  • 1/4 tsp ground cinnamon
  • 1 cup, plus 2 Tbsp whole wheat flour
  • 1 tsp baking powder
  • 1/4 tsp baking soda
  • 1/8 tsp salt
  • 1/2 cup granulated white sugar
  • 1/2 cup vanilla yogurt
  • 1/2 cup milk
  • 1 tsp vanilla extract
  • Ice-cream, whipped cream or sweetened yogurt for serving (optional), I served mine with vanilla ice-cream and it tasted divine!

Directions:

Preheat the oven to 350 F/170 C. Grease each of 4 (8-oz) ramekins with 1/2 Tbsp of butter. In a small cup, melt rest of the butter and keep aside.

Peach Upside-Down Mini Cake1

Sprinkle 1 Tbsp brown sugar evenly at the bottom of each ramekin.

Peach Upside-Down Mini Cake2

Mix diced peaches with lemon zest and ground cinnamon and divide them equally among 4 ramekins.

In a medium bowl, whisk flour, baking powder, baking soda and salt. In a separate bowl, whisk together sugar, yogurt, milk, vanilla and the reserved melted butter.  Add wet mixture to dry mixture and stir gently to barely combine. Do not over-mix.

Peach Upside-Down Mini Cake3

Spoon batter over peaches, diving equally.

Place ramekins on baking sheet and let it bake for 23-25 minutes or till the toothpick inserted in the center of the cakes comes out clean. Transfer ramekins to cool on wire rack.

Peach Upside-Down Mini Cake4

If serving immediately let cool for 5 minutes and run a knife around the edge of each ramekin and turn upside down onto serving plate. Serve topped with ice-cream, whipped cream or sweetened yogurt, if desired or as is.

If you are baking ahead of serving time then let the cakes cool for 10 minutes before releasing them from ramekins as the sugar and fruit juices would have thicken a bit by then. Re-hit in the microwave for 20-25 seconds before serving.

Directions:

  1. Preheat the oven to 350 F/170 C. Grease each of 4 (8-oz) ramekins with 1/2 Tbsp of butter. In a small cup, melt rest of the butter and keep aside. Sprinkle 1 Tbsp brown sugar evenly at the bottom of each ramekin.
  2. Mix diced peaches with lemon zest and ground cinnamon and divide them equally among 4 ramekins.
  3. In a medium bowl, whisk flour, baking powder, baking soda and salt. In a separate bowl, whisk together sugar, yogurt, milk, vanilla and the reserved melted butter.  Add wet mixture to dry mixture and stir gently to barely combine. Do not over-mix. Spoon batter over peaches, diving equally.
  4. Place ramekins on baking sheet and let it bake for 23-25 minutes or till the toothpick inserted in the center of the cakes comes out clean. Transfer ramekins to cool on wire rack.
    If serving immediately let cool for 5 minutes and run a knife around the edge of each ramekin and turn upside down onto serving plate. Serve topped with ice-cream, whipped cream or sweetened yogurt, if desired or as is.
    If you are baking ahead of serving time then let the cakes cool for 10 minutes before releasing them from ramekins as the sugar and fruit juices would have thicken a bit by then. Re-hit in the microwave for 20-25 seconds before serving.

Enjoy with your family! 🙂

Cadbury SHOTS topped Beetroot & Chocolate Cupcakes

SHOTS topped Beetroot & Chocolate cupcakes3

I love Cadbury SHOTS!

Their punchline is ‘A Glass and a Half Full of Joy‘ and that is exactly what I feel and more when I pop it in!

Eating them always gets me nostalgic about my college days. It was launched about the same time as I was finishing my internship and was my favorite thing to snack on around that time of my life. That was the most memorable time when we were free from all the tensions of patients, studies and exams, never thinking of what the future holds for us and just a happy, fashionable, giggling bunch of jobless interns who were always gossiping in cafeteria (Of course we used to work when we were not on breaks!!!). Those were the days!!! 🙂

SHOTS topped Beetroot & Chocolate cupcakes1

Cadbury SHOTS is available in a small pack of two which is perrrfect to share with your bestie or your sweetheart! Costs only INR 2/- each! They consist of milk chocolate balls coated in a hard sugar outer layer. But I think they are only available in my part of the world and not elsewhere. How unfortunate! 😦

So to reminisce about that awesome time of my life I decided to top my next cupcakes with these sweeties. I wanted the cupcakes to be chocolate. How boring! So I decided to give it a twist… of Beetroots! I mean I have baked chocolate cupcakes with zucchini before so decided to pretty much replace zucchini with beetroots and it worked like a charm. I tweaked my previous recipe a bit and added melted chocolate in this one instead of chocolate chips as I was topping these with SHOTS!

SHOTS topped Beetroot & Chocolate cupcakes4

The cupcakes are rich in chocolate and beetroot’s flavor is quite earthy yet not overpowering. The insides are gooey and moist! And most important of all, it’s heeaallthyy! Come on, it has whole wheat flour, dark cocoa, dark chocolate and beetroot! 😉

So hop onto the reminiscence train! There are no stations in between.. Share with us that one important nostalgic moment from your college days. We would love to know!

SHOTS topped Beetroot & Chocolate cupcakes2

Cadbury SHOTS topped Beetroot and chocolate Cupcakes

Servings: Makes 6 cupcakes

Ingredients:

  • 2 small raw beetroot bulbs, peeled and grated (about 175 gm)
  • 3/4 cup whole wheat flour
  • 3/4 tsp baking powder
  • pinch of salt
  • 2 Tbsp Hershey’s dark cocoa powder
  • 1/4 tsp cinnamon powder
  • 1/4 tsp nutmeg powder
  • 1/3 cup brown sugar
  • 1 egg, at room temperature
  • 2 Tbsp butter, melted
  • 75 gm 70-80% dark chocolate, melted and cooled
  • 1 tsp vanilla extract
  • 9 Cadbury SHOTS packs, for topping

Directions:

  1. Preheat the oven to 375F/180C. Line 6-count muffin tin with paper liners and set aside.
  2. Sift all the dry ingredients in a large bowl. Stir in the grated beetroot, egg and melted butter.
  3. Add the melted chocolate and vanilla extract. Stir until just combined.
  4. Spoon the batter among the prepared pans. Top each cupcake with 3 Cadbury SHOTS and bake for 21-23 minutes or until a toothpick inserted into the center comes out clean. Set aside to cool completely.

*Cadbury SHOTS has not sponsored me in anyway. All the praise written above is my personal expression of love for them!

Mountain Dew Cupcakes with Mountain Dew Buttercream Frosting

Mountain Dew Cupcakes3

Nowadays I am baking practically everyday!!! I have become a baking fanatic! 😉

I have been mentioning in all my recent posts about how its Summer already and this year around Bangalore has become a magnet for scorching heat!!! I am exhausted! All I wanna do is drink anything and everything from refrigerator and sleep under a fan. I wish!!! A girl can dream, right?! 😉

But my crazy work hours forces me to get out of the house at 1 in noon when its especially terrible.. I am not a morning-person so the timing suits me perfectly but I can’t take this torturous heat anymore! HELP… Is anyone listening to me?! I guess not!!

I seem to have no option other than cribbing in front of you guys and this is when baking came to my rescue! I am baking all refreshing treats which can be eaten chilled! So if you are facing same problem as me then summon your spatulas and heat up your oven! We will face the sun with smile on our face! And don’t forget to whip it good! 😉

Today I am sharing with you all my recipe for Mountain Dew Cupcakes with buttercream frosting. These have a very prominent flavor from Mountain Dew but not over the top.

Mountain Dew Cupcakes1

There is lemon and lime juice and zest in both the batter and frosting, giving them a good kick. The cupcakes are soft and moist. The frosting is velvety and buttery. And they’re perfect for toting along to picnics and cook-outs all summer long!

Mountain Dew Cupcakes2

Serves: 6

Ingredients:

Mountain Dew Cupcakes

  • 1/4 cup butter, softened to room temperature
  • 1/4 cup sugar
  • Zest from 1 lemon
  • Zest from 1 lime
  • 1 egg
  • 3/4 cup all purpose flour
  • 1/2 tsp baking powder
  • 1/8 tsp salt
  • 1/4 cup Mountain Dew
  • 1 Tbsp lemon juice
  • 1 Tbsp lime juice
  • 1/4 tsp pineapple extract

Mountain Dew Buttercream Frosting

  • 1/4 cup butter
  • 1/3 cup powdered sugar
  • 1 Tbsp Mountain Dew
  • 1/2 tsp lemon juice
  • 1/2 tsp lime juice
  • zest from half a lemon
  • zest from half a lime
  • light green food coloring

Directions:

  1. Preheat the oven to 350ºF/180ºC. Line a 6-count muffin tin with paper liners. Set aside.
  2. In a small bowl, whisk together flour, baking powder and salt. In a small cup, stir together Mountain Dew, lemon juice, lime juice and pineapple extract.
  3. In a large bowl, cream together butter and sugar. Add lemon and lime zest and then add egg, give it a good whisk.
  4. Add half of the dry ingredients to the batter. Stir in the wet ingredients and finish off with the rest of the dry ingredients, mixing until just combined. Do not over-mix.
  5. Fill each baking cup 2/3 of the way full. Bake for 15-17 minutes, or until a toothpick inserted in the center comes out clean. Let cupcakes rest in muffin tin for a few minutes before removing. Transfer to a wire rack to cool completely before frosting.
  6. For the frosting: Cream together butter and sugar. Add mountain dew, lemon juice, lime juice and zests. Stir in one or two drops of food color. Add more sugar if required depending upon the consistency and whisk. Frost the cupcakes once they are completely cool.

Margarita Cupcakes

Margarita Cupcakes2

Anyone for a Margarita? Oh, Yeah! And anyone for Margarita cupcakes? Hell, Yeah!!! Monday night does not get any better than this! I mean, what’s not to like?

Cupcakes + Margarita = Match made in Heaven!

These cuppies are made from scratch. No cake box involved. The homemade margarita cupcakes are perfectly soft, fluffy, and bursting with margarita flavor! Plus each bite has a refreshing zest of citrus flavor!

Imagine them topped with margarita cream cheese frosting! Gosh! I mean how can you not smile sinking your teeth into one of these?

Margarita Cupcakes1

The margarita cupcake recipe is laughably easy! Like most of my dessert recipes, I used simple, everyday ingredients. I didn’t even need to go to the store before I made them on Saturday! And that is saying something as I didn’t even have an onion in my pantry that Saturday! I am serious.. Don’t laugh, okay?!.. Stop making fun of me! I am not lazy… Have just been busy! 😛

Margarita Cupcakes3

The cupcakes took me less than 1 hour start to finish. I cheated a bit and stuck the cupcakes in the refrigerator to speed up the cooling process. I have no patience when it involves Margarita! Love it!!! Wait, didn’t I say that already? 😉

Margarita Cupcakes5

These can be stored at room temperature for 1 day in an airtight container and 4 days in the refrigerator.

I loved eating them chilled! It was so refreshing!

Its booming summer and Margarita cupcakes, made from scratch are totally on dessert menu! And breakfast menu. Come on, they have egg and milk in them… Totally acceptable first thing in the morning! 😉

You can brush the cupcakes with straight tequila if you want a boozy dessert before frosting them. And if you are one who enjoys salt on the rim of your margarita glass, you might consider a sprinkle of coarse salt over the top of the cupcake to incorporate that flavor. Are you running towards your kitchen to make these already? 😉

Serving: 6

Ingredients:

Margarita Cupcakes:

  • 1/4 cup butter
  • 1/4 cup sugar
  • 1/2 tsp vanilla extract
  • zest of 1 lemon
  • 1 egg
  • 2/3 cup all purpose flour
  • 1 tsp baking powder
  • 1/8 tsp salt
  • 1/4 cup milk
  • 1/4 cup Margarita Mix

Margarita Cream Cheese Frosting:

  • 1/2 package cream cheese
  • 1/4 cup butter
  • 2 Tbsp powdered sugar
  • 1 Tbsp Margarita Mix
  • zest of 1 lemon
  • a drop of green and yellow food coloring

Directions:

  1. Preheat the oven to 350ºF/180ºC. Line 6-count muffin tin with paper liners. Set aside.
  2. Combine salt, baking powder and flour in a small bowl.
  3. Combine the milk and margarita mix in another small bowl (the mixture will curdle, but it’s okay).
  4. Cream butter and sugar with the stand or handheld mixer. Add egg and mix to incorporate and then add lemon zest.
  5. Gradually beat in the flour mixer and the liquid mixer, alternating them, making sure to start and end with flour mix. Beat as little as possible, just until the batter come together.
  6. Fill the paper liners till 2/3rd of the cups are filled. Bake for 15-17 minutes, or until a toothpick inserted in the center of a cupcake comes out clean. Let cool.
  7. To make frosting: Whip everything together, adding a drop of green and yellow food coloring for effect. Add more powdered sugar if frosting is thin. Pipe onto the cooled cupcakes. I simply smothered mine with the spatula and decorated them with green and yellow colored sugar. There may be leftover frosting depending upon how much you use on each cupcake.

Make a toast and Enjoy! 😀

Recipe source: cookbybook.wordpress.com

© Cook By Book