2-Layer Rose Coconut Cake

RoseCoconut-2

Spring is a time for rebirth and renewal, a time for change. I decided make a change this year with finally reviving this space of mine (yeah, not that profound I know) and in a world where we hardly have control over anything, changing up this little thing makes me super super happy. We have so much to catch up on and gazillion delicious recipes coming your way! But first, THIS! ☝

So end of last year, I bought myself a set of 6-inch cake pans and these are game changers (should have got them sooner!). Small batch baking has always been my thing (here, here and some more) so the smaller size pans were way overdue. I have baked at least 7 layer cakes in these not-so-new-pans-anymore this past 3 months (not hard to believe right?!). It’s just 2 of us in the house and I do like to eat everything I make (you bet it shows) hence small batch baking wins big time in my book so this was definitely long time coming. Not that we I need any occasion to eat cake around here but guys, these 6-inch layer cakes are so very perfect for small gatherings. Not to mention but they look so dang cute. If you are baking for more people then no problem. Just double the recipe and make 4-layers instead, tall cakes are in and they are here to stay! Well, you certainly don’t need to wait for any gathering to make this one right here. It can totally be you+couch+fork situation, demolishing the whole thing by yourself. Believe me, you would want to!

RoseCoconut4

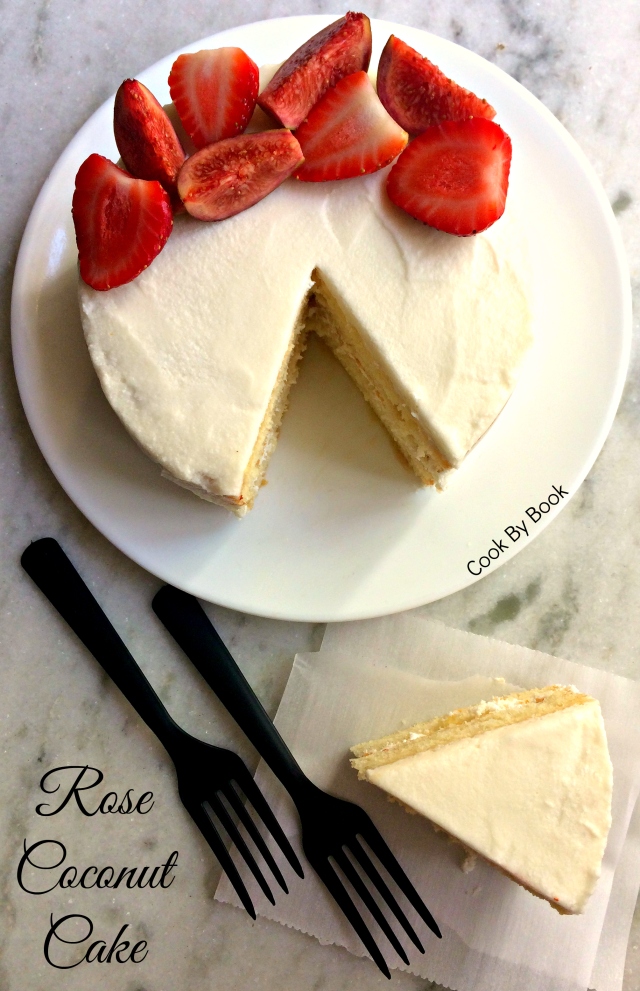
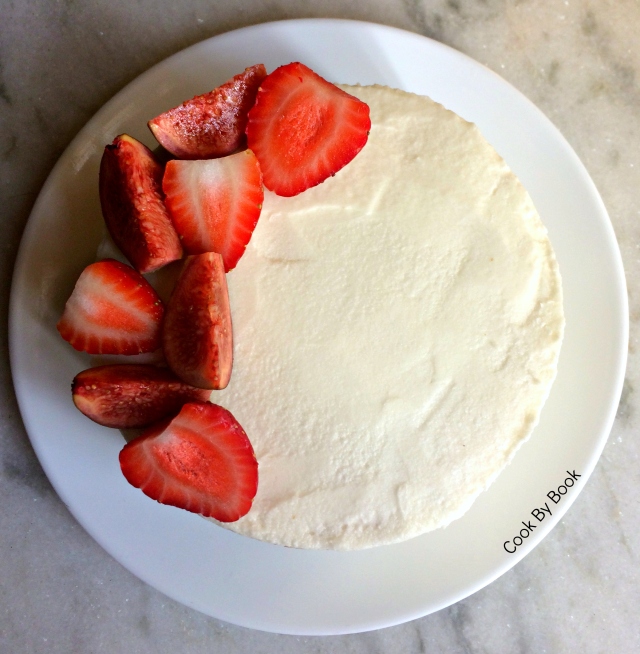
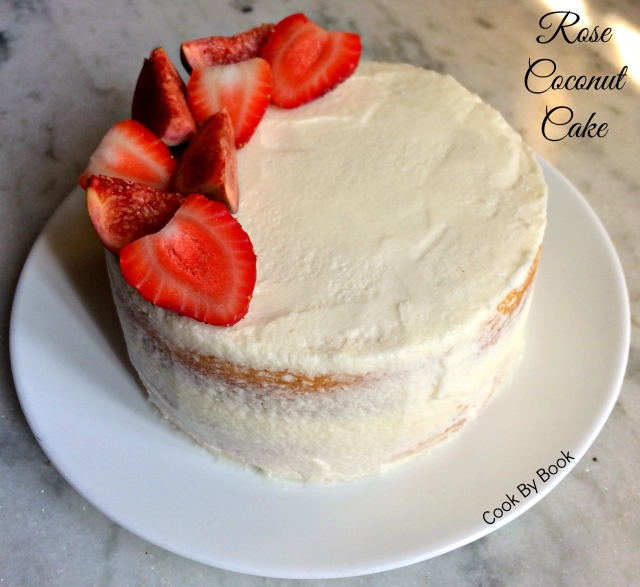
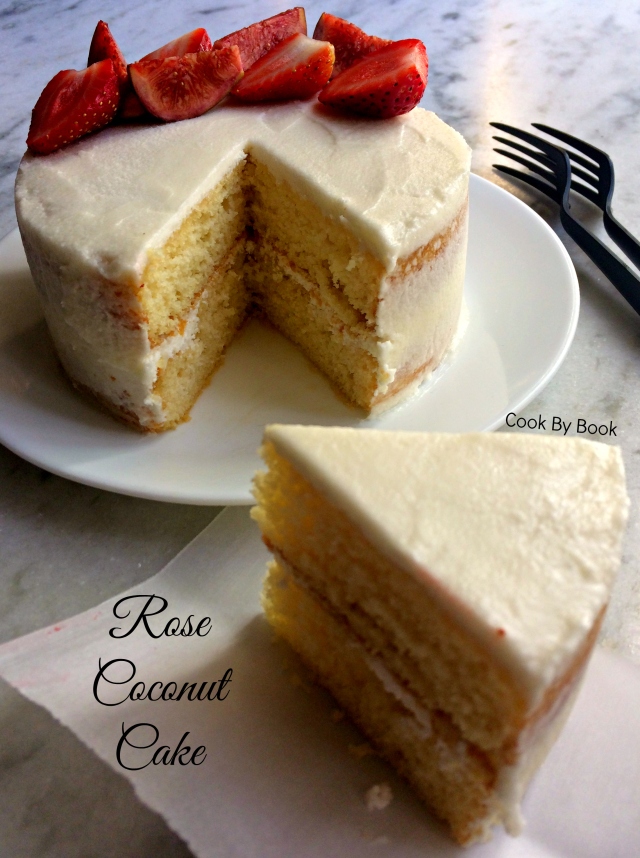
So let’s talk about this particular cake here. This elegant looking, mildly flavoured, rose scented cake. The flavours will totally make you reminisce about the sweet smell of rose garden. The minimalist, semi-naked look is pristine for the spring season and is bound to make any brunch-table look chic and gorgeous. I have paired three different flavours for this cake but none overwhelms the other and are rather in complete harmony, even complimenting each other. Rose, coconut and cardamom seems to be a match made in spring heaven. So lush! I hope you enjoy this cake as much as we did!

RoseCoconut3

2-Layer Rose Coconut Cake

Prep time: 20 minutes | Bake time: 20 minutes | Total active time: 40 minutes

Ingredients:

  • 1 cup all purpose flour
  • 1/2 Tbsp baking powder
  • 1/4 tsp ground cardamom
  • Pinch of salt
  • 3 Tbsp unsalted butter, softened at room temperature
  • 1/2 cup caster sugar
  • 1/2 tsp vanilla extract
  • 1/2 tsp rose extract or 1 Tbsp organic rose water
  • 1 large egg, room temperature
  • 1/2 cup coconut milk, room temperature

Coconut Buttercream Frosting:

  • 1/3 cup unsalted butter, softened at room temperature
  • 4 Tbsp coconut milk, refrigerated
  • 1 cup confectioners sugar
  • Pinch of salt
  • 1/4 tsp rose extract
  • 1/4 tsp coconut extract (optional)

Directions:

  1. Grease 2 6-inch round cake pans with flavourless oil and line the bottom with parchment paper. Preheat the oven at 180°C/350°F.
  2. In a small bowl, sieve all purpose flour, baking powder, ground cardamom and pinch of salt. Give it a whisk.
  3. In another mixing bowl, cream together butter and sugar until light and creamy. Add vanilla extract, rose extract, egg and whisk very well until incorporated.
  4. Now whisk in dry ingredients to wet ingredients alternating with coconut milk in 3 additions, beginning and ending with dry ingredients. Be careful not to overmix.
  5. Divide the batter in to the cake pans and bake for 20 minutes or until toothpick inserted in the center comes out clean. Let it cool on wire rack for about 5 minutes before demoulding. Let the cakes cool completely on wire rack and meanwhile get on the frosting.
  6. Coconut Buttercream Frosting: In a mixing bowl, cream together butter and coconut milk using electric mixer until smooth. With the mixer on low-speed, add confectioners sugar and salt and beat until just combined. Once incorporated, turn up the speed to medium-high and beat until fluffy (about 5 minutes). Adjust the sugar until your desired consistency achieved. Briskly whisk in rose extract and coconut extract (for like 10 seconds).
  7. Assembly: Once the cakes are completely cool, place one layer of the cake onto the serving plate (bottom side up). Spread about 3 Tbsp of frosting on this layer, spread it uniformly and top it with the second layer (bottom side up). Spread about 2 Tbsp of frosting on top, spread uniformly and crumb coat the sides. Let the cake rest in refrigerator for about 15-20 minutes. Frost with the remaining buttercream frosting and decorate as desired. I topped mine with fresh figs and fresh strawberry slices. The cake stays fresh for 4 days, stored in an air-tight container in the refrigerator.


RoseCoconut1

Zesty Peaches & Cream Mini Bundt Cake

Zesty Peaches & Cream Mini Bundt Cake1

Hiya.. I hope you all had a wonderful Independence Day long weekend. Ours was relaxed and lazy and juust perfect. Monday was tough indeed. Today was only bearable because I had this cake in my life. First bite into it and I instantly regretted making a mini version because this was over in seconds!! So to save you from regret I suggest you double the following recipe and make 2 mini bundts! 😉

The combination of orange, peach and cream cheese is blow-your-mind-off-amazing! This mini bundt is supremely moist unlike the dry, crumbly pound cakes we all dread. It turns into a piece of heaven drizzled with the vanilla glaze. Isn’t this mini size so cute! Give this a go before the peach season officially ends.

Enjoy & eat it all up! 🙂


Zesty Peaches & Cream Mini Bundt Cake4


Zesty Peaches & Cream Mini Bundt Cake

Yields: 1 6-inch bundt | Serves: 6 | Prep time: 15 minutes | Bake time: 30 minutes | Total time: 45 minutes

Ingredients:
For Cake:
  • 1/4 cup peach cubes (about 1 medium /2 small peaches, peeled & pitted)
  • 1/2 Tbsp all-purpose flour
  • Zest of 1 Naval orange
  • 1/3 cup sugar
  • 1 large egg
  • 1/4 cup unsalted butter, at room temperature
  • 2 Tbsp cream cheese, at room temperature
  • 2 Tbsp freshly squeezed orange juice
  • 1 tsp vanilla extract
  • 1/2 tsp orange extract
  • 1/2 cup all purpose flour, sifted
  • 1/2 tsp baking powder
  • Pinch of salt

For Glaze:

  • 4 Tbsp powdered sugar
  • 1 tsp vanilla extract
  • 1 tsp milk or cream (add more to adjust the consistency)

Directions:

  1. Preheat the oven at 160°C / 325°F. Grease 6-inch mini bundt pan with oil/butter. Set aside.
  2. Put the prepared peach cubes in a bowl. Sprinkle the peach cubes with all purpose flour. Stir lightly, just until peach cubes are coated with the flour.
  3. In a medium mixing bowl, add orange zest and sugar and rub it together with your fingers to release the natural oils from the zest. Add butter and egg to the bowl. Cream together butter, egg, sugar & zest with the whisk or using hand held mixer. Whisk in cream cheese, orange juice, vanilla and orange extract. Slowly and carefully, mix in all purpose flour, baking powder and salt. Do not overmix.
  4. Fold in the prepared peach cubes to the cake batter and pour the batter in the prepared bundt pan. Bake for 26-28 minutes or until the toothpick inserted in the center comes out clean. Let the cake cool in the bundt pan for 5 minutes before inverting on a cooling rack to cool completely.
  5. For glaze: Combine powdered sugar, vanilla extract and milk, adding a teaspoon of milk at a time until glaze reaches desired consistency.


Zesty Peaches & Cream Mini Bundt Cake2

2-layer Pure Vanilla Cake ~ 1st Blogversary!!!

2-layer Pure Vanilla Cake1


Cook By Book in numbers:

– 500+ blog subscribers via email
– 140 on WordPress
– 160+ on Twitter
– 385+ on Instagram
-102 blogposts

My blog officially turns 1 today! Woohoooo!! Last year today I created and set up this blog and published my first blog-post the next day. For about 2 months before starting this space, I used to publish my recipes and pictures on my Facebook page but later I realized I wanted to share more than just a picture and a recipe with you all, in a more customized manner. That’s how this blog was born. It feels just like yesterday but time really flies when you blog. Blogging has taught me so much. Food photography and food styling is what I’ve become totally obsessed with! It is such a great way to connect with like-minded people all around the world and learn about their culture through food. I have made some awesome new friends!

I owe it all to you gorgeous readers! Thank you for making this past year so fulfilling, from having less than 5 to 500+ followers and many more on social media, I’m very grateful for all the support and love so far. Whether it is just a comment, an email or a follow, I want to thank you for all the amazing gestures that has made blogging so so incredible for me!


2-layer Pure Vanilla Cake2


I’m so so so happy, totally in celebratory mood! Throwing a party kinda mood. When I’m happy, I bake. So I baked a cake for this virtual party. It’s a party essential after all. Also, it is neither healthy nor low-fat. It’s buttery, sugary deliciousness. Pure vanilla goodness completely covered in pink whipped cream frosting. Yes! Today I’m sharing a classic vanilla cake which is sturdy in layer-cakes but moist and tender at the same time. A cake you can always depend upon. Make this your go-to recipe for anytime layer-cake requirements. Birthdays, Anniversaries or Weddings. An all-occasion versatile cake.


2-layer Pure Vanilla Cake3


I am no professional at frosting/decorating cakes but I’ve tried my best! Also, I did not have time to make frosting from scratch so I used packaged instant whipped cream, flavored it with 1/2 tsp vanilla extract and colored it with a drop of pink food color. It tasted pretty good too. I hope you enjoy this cake as much as I, husband, a friend, neighbors and my house-help enjoyed! Yes, I believe in sharing the goodness. Always! 🙂

2-layer Pure Vanilla Cake

Makes: 2 7-inch layers | Prep time: 20 minutes | Bake time: 30-35 minutes | Total time: 1 hour

Ingredients:

  • 2 cups all-purpose flour
  • 1 tsp baking powder
  • 1/4 tsp salt
  • A little less than 1/2 cup unsalted butter, at room temperature (about 100 gm)
  • 1 and 1/4 cups white granulated sugar*
  • Seeds scraped from 1/2 vanilla bean
  • 2 tsp vanilla extract
  • 2 large egg whites
  • 1 cup milk

*If you like your baked goods on a sweeter side, use 1 and 1/2 cups sugar instead.

Directions:

  1. Preheat the oven at 170ºC / 340ºF. Butter and flour two 7-inch (5-inch or 6-inch works too) baking pans and set aside.
  2. In a bowl, sift together flour, baking powder and salt. Set aside.
  3. In a bowl of your electric mixer, beat butter and sugar together until pale and creamy, about 3-4 minutes. Add vanilla bean seeds, vanilla extract and egg whites and mix until smooth.
  4. Add dry ingredients to the wet ingredients alternating with milk, beginning and ending with dry ingredients.
  5. Gently stir all ingredients until well combined. Stop mixer and scrape down sides and bottom of the bowl, making sure to have all ingredients mixed well.
  6. Divide batter among baking pans and bake for about 30-35 minutes or until a toothpick inserted in a center comes out clean. Remove and let cool slightly in baking pans for about 5 minutes, then invert on a wire rack and let cool completely.
  7. Frost cakes as desired. Use this Vanilla Bean Frosting recipe and instructions on how-to-frost-a-layered-cake. I colored the frosting with a drop of rose pink food color.

Note: If cakes are baked in 6-inch baking pans, you may cut them so that you have four layers altogether and if cakes are baked in 5-inch baking pans, you may cut them so that you have six layers altogether. This way you can make 4-layer or 6-layer cake using the same recipe.

Christmas Fruit Cake

Christmas Fruit Cake1


This was going to be my first year baking Christmas cake. I was super-excited! Really! I prepared the fruit-soak almost 3 weeks in advance which is major for me as I have never been much of a planner! And of course for the recipe as the liqueur gets a chance to marry the fruit 😉

I started hunting for recipes months ago. And I got to know that Christmas cakes have got such bad reputation! They are quite infamous for being boring, dry, overly sweet and like a hard brick that I was fairly skeptical at even attempting to make it at home. It deterred my enthusiasm quite a bit. Hence it was a pretty daunting task zeroing on THE recipe. But finally chanced upon the one which spoke to me and boy, hold your breath people, I have found THE recipe for your Christmas cake this year!


Christmas Fruit Cake4

Assorted fruits & nuts mixed in before pouring the liquere


Christmas Fruit Cake2


The recipe is fairly simple. As I told you before, the fruit-mix needs to be soaked in advance. Then a night before making the cake, just simmer few ingredients. This step guarantees moister and softer cake as the fruit-mix get a chance to soften up a bit. Dump all the other ingredients into this mixture. And that’s it! You know I have a thing for simple and quick recipes and this was just that! Pop the cakes to be baked in the oven and forget about them for an hour. Do whatever you do in the meanwhile like get lost on Pinterest (so addicting!) or doing your nails (perfect utilization of time!) and they’ll be ready! I did a taste from my mini loaf and the cake was supremely moist! Success!!


Christmas Fruit Cake3


Be sure to wrap the cakes (tightly) soon (when they are still quite warm.. almost hot) after removing from moulds and showering them with liqueur, to avoid anymore direct contact with the atmosphere. This will ensure that the moisture gets locked. If you want more liqueur then feed the cakes every 6-7 days with more liqueur (till ready to eat) and wrap them back. They taste best after several days/weeks of aging so be patient! 🙂

Happy Baking!!
xx

Christmas Fruit Cake

Recipe barely adapted from Rasa Malaysia

Fruit-Mix: To be prepared 2-3 weeks in advance or at least 48 hrs before

  • 7 cups chopped mixed fruits (I used assortment of raisins, sultanas, black currents, dried cranberries, dried apricots, dried pineapple, dried figs, glaced cherries, tutti frutti, orange and lemon peel)
  • 1 cup of roasted nuts (walnuts, almonds, hazelnuts, pecans or pistachio – I used walnuts and almonds)
  • 1-1.5 cups of brandy or rum

Pour the chosen liqueur over dried fruits and roasted nuts and store this mix in a glass airtight container in a cool,dry place.

Preparing Cake:

Ingredients:

  • 1 cup unsalted butter
  • 1 cup brown sugar
  • 1/2 cup honey
  • 1 cup orange juice
  • 1 tsp baking soda
  • 2 1/3 cups all purpose flour
  • 2 Tbsp milk powder (I skipped it & I don’t think it made a difference)
  • 2 Tbsp fresh orange zest
  • 1 Tbsp fresh lemon zest
  • 1 tsp ground nutmeg
  • 1 heaping tsp ground cinnamon
  • 1/4 tsp ginger powder
  • 1/4 tsp ground cloves
  • 4 large eggs, slightly beaten

Directions:

  1. Combine prepared fruit-mix (fruits+nuts+liqueur), butter, sugar, honey, orange juice and baking soda in a large saucepan. Stir over low heat until the sugar has dissolved. Bring the mixture to boil and simmer for about 5 minutes over low heat. Stir consistently. Remove the saucepan and leave to cool. Do this step a night before or few hours before making the the cake as it takes sometime for the mixture to completely cool.
  2. Preheat the oven to 150ºC/300ºF. Grease 8×4 inch loaf pan and 6-count (3×2 inch) brownie pan with butter. Set aside.
  3. In a medium bowl, sift together flour, milk powder, zests and ground spices.
  4. Gently stir in eggs to the cooled fruit mixture. Fold in the dry ingredients. Divide the mixture in to 2 parts and pour one half in loaf pan and the other half in brownie pan. Bake for about 60 minutes or until top slight cracks and is cooked.
  5. Remove the cake from the mould after letting cool for 5-10 minutes and generously brush the tops with brandy/rum. If you’re bold enough, make several holes in the cake by inserting skewer through n through at several places and pour the liqueur generously. Tightly cover with multiple layers of aluminium foil and finally with plastic wrap. Store in an airtight container. The cake tastes best eaten after a few days of aging. If you’re making weeks ahead like I did, brush the cake with brandy/rum every 6-7 days.

*Serve with a dusting of powdered sugar and decorated with glaced cherries and slivered almonds.

♥ Another great recipe I chanced upon is here. Do check it out!

Healthy Chocolate Beetroot Bundt Cake

Healthy Chocolate Beetroot Cake2

I baked 3 batches of cookies this Monday to be sent for the cookie swap I am participating in. I wanted to do this precisely on a weekday so that I can courier the cookies on the same evening and they reach their destination in another 2 days, when they can be still considered FRESH! Good news is that one shipment was delivered yesterday and the other 2 were out for delivery today morning… Success! The bad news is I can’t share those cookie recipes with you… Not yet 😦

So to celebrate, I am sharing this awesome chocolate bundt with you all today. And as you must have guessed already, it is undoubtedly a healthy recipe! This time I have experimented with beetroot purée and liquid jaggery. I was feeling quite proud of myself while presenting this cake in front of Mr and some guests as the experiment turned out a total success! Nobody could guess/taste the secret ingredients… Even the kids!! 😀

Healthy Chocolate Beetroot Cake1

This cake is supremely moist because of puréed beetroot and olive oil. Liquid jaggery lends most of the sweetness and the brown sugar with chocolate lends works beautifully with chocolate. The taste is rich and exceptionally chocolaty. A top performer in my opinion!

The batter is a simple 1-bowl creation which comes together easily and can be prepared even without electric mixer. It bakes fairly quickly compared to any other bundt cakes. After the cake cools completely, simply pour ganache over it and serve a giant, thick slice of your masterpiece!

Healthy Chocolate Beetroot Cake3

If you fear the bundt pan, let me give you a tip on ‘How-To’. Generously grease the pan with butter and lightly dust it with flour. This is a foolproof way and the cake will not stick to the pan or break in pieces when you invert it on a cooling rack. So spend some time on this step before you start with the cake batter. After the cake bakes, let it cool in pan for 15-20 minutes before trying to release it from the pan. Perfection! So let go of your fear of bundt pan and whip up this decadent deliciousness NOW!

Healthy Chocolate Beetroot Bundt Cake with Dark Chocolate Ganache

Serves: 12 | Prep time: 20 minutes | Bake time: 35 minutes approximately

Ingredients:

Dry ingredients:

  • 2 cups whole wheat flour
  • 3/4 cup +1 Tbsp Hershey’s unsweetened cocoa powder
  • 1 tsp cinnamon powder
  • 2 tsp baking powder
  • 1 tsp baking soda
  • 1 tsp salt

Wet ingredients:

  • 1/3 cup extra-virgin olive oil
  • 1/4 cup brown sugar
  • 3/4 cup liquid jaggery
  • 3 large eggs
  • 1/3 cup plain yogurt
  • 1 + 2/3 cup beetroot purée, (around 4 medium beetroots boiled, peeled and puréed)
  • 1 Tbsp vanilla extract

Ganache:

  • 2 Tbsp medium fat cream/milk
  • 3 oz dark chocolate, roughly chopped

Directions:

  1. Preheat the oven at 190 C/375 F. Grease a bundt pan nicely with butter and dust it with flour.
  2. In a medium bowl, sift together all the dry ingredients.
  3. In a bowl of your electric mixer, fitted with paddle attachment, add olive oil and brown sugar and beat on a low speed. Add liquid jaggery and continue to beat.
  4. Increase the speed to medium-high, add one egg at a time and beat for 2 minutes after each addition. Beat in yogurt.
  5. Slowly add beetroot purée and dry ingredients in 2 additions, ending with dry ingredients. Scrape the sides of the bowl with spatula and beat until just combined. Do not over-mix the batter.
  6. Pour the batter to the prepared bundt pan and bake for 33-35 minutes. Toothpick inserted near the centre of the pan should come out clean or just with few moist crumbs. Let the cake cool in a pan for 15-20 minutes before inverting on a wire rack.
  7. Heat a small sauce pan and add cream/milk to it. Once the cream/milk is hot(not bubbling), remove it from heat. Add chocolate to it and stir continuously until chocolate has melted completely. Pour the ganache over the cake. Cut a thick slice and serve.

*Store the cake in an airtight container. Stays fresh on a counter for 1 day and in refrigerator for 5-6 days.
*The cake is enough sweet for me but in case you like your baked products quite sweet then increase the quantity of brown sugar in the batter as per your taste. Lick, taste and then proceed! 😉

Still scared of a bundt? Try these delicious cupcakes!
Happy Baking! xx

Figs & Orange Honey Mini Loaf-Cakes ~ Of course, Healthy!

Figs & Orange Honey Mini Loaf-Cakes1


I am totally in a holiday season mode.

Brace yourselves for the news I am about to break to you guys.. I brought out the planner in me(!!!) and prepared the fruit soak for my very first Christmas fruit cake 2 days back! I am definitely on top of the game. If you follow me on Instagram you already know. I can’t seem to contain my excitement. I’m counting down the days to bake and to be able to eat the final product.

I am going to let this fruit mix soak for about 3 weeks before baking into a delicious cake. This way cake will get a chance to age for about 3+ weeks before it’s Christmas! My kitchen air turned heavenly with all those fruits and citrus peels. No scented candles required.. Happy days I tell ya! 🙂

Another thing is I am baking a WHOLE lot more. I know I am not posting enough on the blog but I am baking A LOT! The weather is cold and rainy and all I want to eat at any time of the day is a piece of warm, cinnamony baked goodies. So with this awesome weather and so much baked goodies around me, all I am doing is relaxing, eating and lurking around other blogs! Can you blame me?! I mean so much holiday baking is happening everywhere!


Figs & Orange Honey Mini Loaf-Cakes2


On one fine morning, I made these gorgeous mini cakes and trust me when I tell you, they are the most moist, soft and fragrant cakes ever! One-bowl deliciousness ready in 30 minutes!

Oh, did I mention these are healthy too?!! Oh ya! This recipe is a keeper for those days when you’re eating around lots of unhealthy food on the name of celebration.

Make this quick recipe as a special breakfast treat on festival mornings or while entertaining guests and you’re sure to impress everyone!

Happy Baking! xo


Figs & Orange Honey Mini Loaf-Cakes3

Baking tray before going in the oven


Figs & Orange Honey Mini Loaf-Cakes

Yields: 6 mini loaf-cakes or 12 cupcakes | Prep time: 15 minutes | Bake time: 20 minutes approx

Ingredients:

  • 2 cups whole wheat flour
  • 1 tsp baking powder
  • 1/2 tsp baking soda
  • 1/4 tsp ground cinnamon
  • 1/4 tsp ground nutmeg
  • 1/4 tsp salt
  • 1/3 cup brown sugar
  • 2 tsp orange zest
  • 2 large eggs
  • 4 Tbsp extra-virgin olive oil
  • 1/4 cup honey
  • 1/2 cup yogurt
  • 1 tsp vanilla extract
  • 1/4 cup orange juice
  • 8-9 fresh figs, washed, stemmed

Directions:

  1. Preheat the oven to 180ºC/350ºF. Grease a 6 count mini-loaf silicone mold with baking spray. Set aside. Sift together flour, baking powder, baking soda, cinnamon, nutmeg and salt.
  2. In a medium bowl, combine sugar and orange zest, mixing with spoon to release oils from the zest. Add one egg at a time and beat until creamy, about 3-4 minutes. Add oil, honey, yogurt, vanilla, orange juice and stir to combine.
  3. Add dry ingredients to wet ingredients and stir until just combined. Do not over-mix.
  4. Cut 3 figs into quarters and cut the remaining figs into 4 slices. Fill the molds equally about 2/3rd full and submerge 2 fig quarters in each mold. Arrange 2-3 slices on top of the batter. Bake for about 16 to 18 minutes or until the cake is just firm. Do not over-bake. Allow to cool on a cooling rack for about 10 minutes. Remove from the mold and serve.

*Tastes best when served warm with the topping of Mascarpone or whipped cream, with tea/coffee.

Healthy Avocado Chocolate Cake

Healthy Avocado Chocolate Cake1


Let’s take a little flashback. If I talk about my childhood, back then, Diwali meant school holidays, new clothes, bags full of firecrackers, family gatherings, chants from morning & evening Pujas, Rangolis and stuffing our mouths with cardamom, saffron, coconut, mawa, besan and ghee kissed sugary sweets.

I moved out of the house and city once I started going to college. As  being in a medical profession, we were hardly entitled to any leaves let alone a Diwali break. So most of my Diwalis were spent in hostel with friends, missing my family. It had its moments but I missed my family.. A lot…

After college, I immediately got married to the love of my life and from then on, I have been spending Diwali with him and my new family. After so many years, so many things have changed but many things remain just the same like Pujas, Rangolis and family gatherings. My eating habits have changed for good and I prefer making my sweets healthier and low-cal. The recipe I am posting today is one such healthy cake and perfect for the festive season as it is egg-less!


Healthy Avocado Chocolate Cake2


Healthy Avocado Chocolate Cake3


The cake overall has just 2 Tbsp of extra-virgin olive oil. Don’t be surprised! Our secret ingredient here is avocado which compensates for the butter fat. You can’t taste the avocado in the cake as the richness from chocolate masks it completely. Not even pickiest of eater will be able to tell! So make this ultimate soft, moist and super-chocolaty cake for the mother of all the festivals… Diwali!

Light Food means Light(er) You! After all it is a Festival of Lights!

It has been 10 years since I moved out and I still miss my family on each and every festival that I’m not able to spend with them. Enjoy all the time you get to spend with your family and loved ones. Make precious memories to be cherished forever.


cccedb1a438711e3a3c622000a1f9a51_7

Rangoli I made today! Not a masterpiece but still!


Happy and sparkling Diwali to all my readers 🙂

Healthy Avocado Chocolate Pan

Yields: 1 9-inch cake | Prep time: 10 minutes | Bake time: 35 minutes | Total: 45 minutes

Ingredients:

  • 1 1/2 cups whole wheat flour
  • 1/2 cup unsweetened cocoa powder
  • 1 tsp baking powder
  • 3/4 tsp baking soda
  • 1 tsp espresso powder
  • 1/4 tsp salt
  • 1 ripe avocado, pitted, peeled and pureed
  • 2/3 cup honey (I used 1/2 cup honey + 1/4 cup brown sugar)
  • 3/4 cup milk
  • 2 Tbsp extra-virgin olive oil
  • 1 tsp pure vanilla extract
  • 1/2 cup dark chocolate chips

Directions:

  1. Preheat the oven 180°C/350°F. Grease a 9-inch quiche pan.
  2. In a large bowl, sift together flour, cocoa powder, baking powder, baking soda, espresso powder and salt.
  3. In another medium bowl, whisk together avocado puree, honey (or combination of honey and sugar if using), milk, olive oil and vanilla extract.
  4. Make a well in the center of dry ingredients and add wet ingredients in 2 additions. Mix slowly until just combined. Do not over-mix.
  5. Pour the batter to the prepared quiche pan and sprinkle with chocolate chips. Bake in the oven for 33-35 minutes till the toothpick inserted in the center comes out clean. Let cool completely before slicing. Serve as is or with vanilla ice-cream.

Guest Post on The Vanilla Bean: Pineapple~Coconut Breakfast Loaf

Pineapple-Coconut Breakfast Loaf1


When Roshni from The Vanilla Bean asked me to do a guest-post on her blog, I wanted to bake something simple and quick for her readers. Yet something which look and taste like you’ve spent the whole morning working on it but in fact was just left in the oven to work its own magic.

Roshni has a special soft corner for cakes hence I decided to rustle up this breakfast loaf which is moist and crunchy at the same time. Each bite is filled with pineapple and coconut bits. It’s a tropical heaven! Perfect for the rushed up mornings. Just plonk it in the oven right before you had for the bath and it would be ready when you’re back!

The loaf is actually quite healthy with whole wheat flour, olive oil and brown sugar. Feel free to substitute the sugar in the recipe with date syrup, honey or liquid jaggery.

Drop by here to get my recipe of pineapple-coconut breakfast loaf and don’t forget to check out The Vanilla Bean blog for some delicious recipes. Thank you again, Roshni, for having me over!

Sweet~Lime Layer Cake with Cream Cheese Filling & Vanilla Bean Frosting

Sweet-Lime Layer Cake with Vanilla Bean Frosting1
I mentioned in my previous posts that I’m surrounded by family from past few weeks. Last Friday, the 13th was husband’s birthday. His folks were in town for the celebration. Yaay! So as you must have already guessed, I was going to bake the birthday cake myself. I asked him what flavour he would like this year and without thinking much he said I want lemon… And I was like, lemon cake?! Really?!!
I was thinking more like my favorite chocolate cake layered in a fancy tier-cake, filled with chocolate ganache and slathered with mocha frosting and he says he wants lemon this year?! Hmm… Even though I was a lil disappointed, I obliged to his wishes! I knoooww *best wife of the year* isn’t it! I had to add my own twist to the cake of course and hence this awesomeness happened. Less tart but tangy, zesty and supremely moist.. win-win for all! Of course, I didn’t tell him that it is sweet-lime until he ate a giant piece at midnight! He was indeed surprised and super-happy which made my whole-day’s effort totally worth it! 😀
Sweet-Lime Layer Cake with Vanilla Bean Frosting2
I had made sort of a similar cake with lemons few months ago for my dear friend’s baby girl. It marked her 1st month on the earth. That cake was egg-less, used buttermilk and everyone loved it! So I just had to tweak my old recipe a bit and came up with this soft, springy and moist cake. Layered with cream cheese filling which is out-of-the-world but the hero here guys is, vanilla bean frosting… It is AWESOME! Trust me 🙂
Sweet-Lime Layer Cake with Vanilla Bean Frosting5
Sweet-Lime Layer Cake with Vanilla Bean Frosting4
I made every single element on this cake on same day. If you do not have such a luxury of time then I suggest you make cakes a day before and refrigerate them individually covered in clingfilm until you’re ready for assembly. Make filling and frosting just before assembling the layers. This will certainly cut down on waiting time as the cakes would be cool and ready for the assembly the next day. So let’s get on with the recipe!
*Please pardon the pictures as the only chance I got was couple minutes before the celebration!
Sweet~Lime Layer Cake with Cream Cheese Filling & Vanilla Bean Frosting
Makes: 1 6-inch 3-layered cake
Ingredients:
For the cake:
  • 2 and 1/2 cup all-purpose flour
  • 1/2 Tbsp baking powder
  • 1/2 tsp baking soda
  • 1/4 tsp salt
  • 14 1-inch cubes of unsalted butter
  • Zest of 3 sweet-limes
  • 1/2 cup sugar
  • 4 large eggs
  • 1 cup yogurt
  • 1/2 tsp vanilla extract
  • 1/2 cup sweet-lime juice, freshly squeezed (Around 3 sweet-limes needed)

For the filling:

  • 100 gm/4 oz. cream cheese, cold
  • Zest of 1 sweet-lime
  • 1/2 Tbsp lemon juice
  • 3/4 cup icing sugar, sifted
  • 1/2 cup medium-fat cream
For the frosting:
  • 1 cup unsalted butter
  • 1 cup icing sugar, sifted
  • Pinch of salt
  • 1 vanilla bean, split lengthwise
  • 1/2 tsp vanilla extract
  • 3 Tbsp medium-fat cream, whipped
For the garnish:
  • Yellow and green colored sparkling sugar
  • 1 sweet-lime slices

Directions:

To make Cake:

  • Preheat the oven to 180°C / 350° F. Butter and flour the edges of 3 6-inch round cake pans and shake out the excess. Set aside. Line the bottoms of the pans with parchment paper.
  • In a medium mixing bowl, whisk together flour, baking powder, baking soda and salt. Set aside.
  • Add the butter to the large bowl and prepare electric hand-mixer or electric stand-mixer fitted with the paddle attachment.  Add the lime zest to the bowl with the butter.  Beat on medium-high speed for 3 minutes, until light and creamy in color.  Scrape down the sides of the bowl and beat for another minute.
  • Add the sugar to the butter mixture, ¼ cup at a time, beating 1 minute after each addition.  Add eggs, one at a time until incorporated.  Scrape down the sides of the bowl after each addition.
  • Combine yogurt, sweet-lime juice and vanilla extract in a liquid measuring cup.  With the mixer on low speed, add the dry ingredients alternately with the wet ingredients, beginning and ending with the dry ingredients and mixing just until incorporated.  Scrape down the sides of the bowl and mix for 15 seconds longer.
  • Divide the batter between the prepared baking pans.  Bake until golden and a toothpick inserted in the center comes out clean, about 20-22 minutes, rotating the pans halfway through baking. Let cool in the pans about 10 minutes, then invert onto a wire rack and let cool completely.

To make Cream Cheese Filling:

  • Combine the cream cheese and butter in a bowl of an electric mixer. Beat on medium-high speed until smooth and well combined.
  • Mix in icing sugar and beat on low speed until incorporated.
  • Blend in lemon juice and sweet-lime zest. Increase the speed to medium-high and beat until light and fluffy, about 2 minutes. Transfer the mixture to a medium bowl and set aside.
  • Wipe out the mixer bowl and fit with the whisk attachment. Add cream to the bowl and whip on high speed until stiff peaks form, being careful not to overbeat. Mix about a third of the whipped cream into the cream cheese mixture to lighten. Gently fold in the remaining whipped cream until no streaks remain and the mixture is evenly blended.

To make Vanilla Bean Frosting:

  • Add butter to the bowl of an electric mixer fitted with the whisk attachment. Whip on medium-high speed until smooth, about 1 minute.
  • Add icing sugar to the bowl and mix on medium-low speed just until incorporated.
  • Scrape the seeds from the vanilla bean pod into the bowl and add in the salt.  Continue to beat on medium-high speed until smooth, about 1-2 minutes.
  • Mix in the vanilla extract and whipped cream on low speed just until incorporated. Increase the mixer speed and whip on high speed until light and fluffy, scraping down the bowl as needed, about 4 minutes.
Assembly:
  • Level cake layers if necessary. To assemble the cake, place one of the layers on a serving platter. Top with half of the cream cheese filling and smooth in an even layer.  Place a second cake layer on top of the filling and top with the remaining filling. Place the final cake layer on top.
  • Frost the top and sides of the assembled cake with the vanilla bean frosting.
  • Sprinkle some yellow and green colored sparkling sugar around the 1-inch border of the cake. Garnish the centre with the sweet-lime slices.

Notes: 

  • To make the frosting look whiter, use white unsalted butter and clear vanilla extract.
  • If you wish to decorate the top of the cake with piped frosting instead of fruit, double the frosting recipe. Use a pastry bag with a decorative tip to pipe accents on the cake. You may have some extra frosting which is always a good thing in my book! 😉

Pear Studded Life By Chocolate Cake

Pear Studded Life By Chocolate Cake1
I was retrospecting and I had a simple realization… I do not have a single recipe for a chocolate cake on my blog yet! Very shocking for a chocoholic like me! This, this & this simply does not qualify. I’m a strong believer of “A chocolate a day keeps a doctor away!” And this is how this ultimate chocolate cake I’m posting today was born.
The universe conspired and the stars aligned!
It was not as dramatic but you can imagine how delighted I must be after I nailed the recipe.
It is made with simplest of ingredients. You will have everything required in your pantry at any given day or time. Except pears. And you can substitute them depending upon what you have at hand. Substitutes are mentioned at the end of this post.
Pear Studded Life By Chocolate Cake2
As the name suggests this cake is studded with pears. And they are not alone! Cinnamon sprinkled pears! Cinnamon enhances the pears’ sweetness and this combo is truly heavenly. You can smell the magic of Fall in your kitchen! The weather here has been just perfect for this. I used Red Anjou pears as that is what I had at the moment and they went perfectly with this cake. Comice pears would be excellent choice too!
Pear Studded Life By Chocolate Cake4
Pear Studded Life By Chocolate Cake3
I chose to call this cake Life By Chocolate Cake. You gotta eat it to know why but I’ll try telling you in words why?! First of all it is not one of those overly rich, heavy, cocoa powderish death by chocolaty cakes you’re so accustomed to seeing/eating around. Nope… This tastes nothing like those which makes you stop eating half-way because it is just too-over-the-top-chocolaty. THIS is a stark opposite of it. This cake is moist, light yet chocolicious, silky, melt in the mouth, perfect piece of chocolate cake ever produced in my kitchen! No one can eat just one slice of it. Chocolate heaven! And if you get a chance to make this, i can guarantee that this will be the best chocolate cake you’ll ever make! Trust me on this one…
So wait no longer… You NEED this chocolate cake in your life, like RIGHT NOW!!
Pear Studded Life By Chocolate Cake5
Pear Studded Life By Chocolate Cake
Yields: 6-8 slices
Ingredients:

  • 1/3 cup butter
  • 100 gm dark chocolate, roughly chopped
  • 2 tsp vanilla extract
  • 3/4 cup + 1 Tbsp all-purpose flour
  • 1 Tbsp unsweetened cocoa powder
  • 1/2 tsp baking soda
  • 1 pinch salt
  • 3 large eggs
  • 1/2 + 1/3 cup brown sugar
  • 4 Red Anjou/Comice pears, peeled, halved and cored
  • 1 tsp ground cinnamon
  • icing sugar, for dusting
  • To grease the tin: 1 Tbsp melted butter and 2 Tbsp caster sugar

Directions:

  1. Cut a circle of baking parchment to fit the base of 9-inch round spring-form tin. Melt 1 Tbsp butter and brush the base and sides of the tin, then line the base with the parchment and brush again with more butter. Dust 2 Tbsp of caster sugar to coat the base and sides, then tip out any excess.
  2. Preheat the oven to 180ºC/350ºF. Take roughly chopped chocolate and butter together in a heat-proof bowl and microwave it for about 1 minute or less till the chocolate has melted completely, stirring in between at the interval of 30 seconds. Whisk in vanilla extract and set aside to cool a little.
  3. In another smallish bowl, sift together flour, cocoa powder, baking soda and salt and set aside.
  4. Put the eggs and brown sugar together in a bowl and using electric mixer’s paddle attachment, beat together vigorously for about 3 minutes until you achieve a pale, aerated and thickened cream-like consistency.
  5. Turn the speed down a little and pour in the butter-chocolate mixture, beating continuously. Then slowly tip in the dry ingredients. Scrape down the bowl, gently fold in with a spatula and pour the batter into the prepared tin. Bake for 10-15 minutes.
  6. Meanwhile prepare the pears. Sprinkle the peeled, halved and cored pears with cinnamon and gently arrange on top of the cake in a circular fashion (as shown in photograph). Bake for another 23-25 minutes till the skewer inserted in the center comes out clean or with a very few chocolate crumbs clinging to it. Do not overcook.
  7. Let it cool for 10 minutes on a wire rack, still in its tin, and then ease the sides of the cake with a spatula and spring it out of the tin. Leave to cool completely or eat while it is still warm with dusting of icing sugar and a dollop of ice-cream.

Notes: Feel free to substitute pears for any other fruit of your choice like raspberries, strawberries, oranges or peaches. Tastes amazing even without adding any fruit to it.

Oh ya,

HAPPY RAKHI Everyone!

Enjoy!!! 🙂