New website!

COOKBYBOOK LOGO-HIGHRES

Hello readers!

I am happy to announce the new address for Cook By Book. My brand new website is up and running since couple of months now and I have started posting new content on it already. You can still browse the old content on this old wordpress website as I am not shutting it completely but I would really appreciate it if you show some love to my new baby by subscribing so you do not miss out on new recipes in future.

Hope to see you all over there and wish me luck!

Love,
Cook By Book

2-Layer Rose Coconut Cake

RoseCoconut-2

Spring is a time for rebirth and renewal, a time for change. I decided make a change this year with finally reviving this space of mine (yeah, not that profound I know) and in a world where we hardly have control over anything, changing up this little thing makes me super super happy. We have so much to catch up on and gazillion delicious recipes coming your way! But first, THIS! ☝

So end of last year, I bought myself a set of 6-inch cake pans and these are game changers (should have got them sooner!). Small batch baking has always been my thing (here, here and some more) so the smaller size pans were way overdue. I have baked at least 7 layer cakes in these not-so-new-pans-anymore this past 3 months (not hard to believe right?!). It’s just 2 of us in the house and I do like to eat everything I make (you bet it shows) hence small batch baking wins big time in my book so this was definitely long time coming. Not that we I need any occasion to eat cake around here but guys, these 6-inch layer cakes are so very perfect for small gatherings. Not to mention but they look so dang cute. If you are baking for more people then no problem. Just double the recipe and make 4-layers instead, tall cakes are in and they are here to stay! Well, you certainly don’t need to wait for any gathering to make this one right here. It can totally be you+couch+fork situation, demolishing the whole thing by yourself. Believe me, you would want to!

RoseCoconut4

So let’s talk about this particular cake here. This elegant looking, mildly flavoured, rose scented cake. The flavours will totally make you reminisce about the sweet smell of rose garden. The minimalist, semi-naked look is pristine for the spring season and is bound to make any brunch-table look chic and gorgeous. I have paired three different flavours for this cake but none overwhelms the other and are rather in complete harmony, even complimenting each other. Rose, coconut and cardamom seems to be a match made in spring heaven. So lush! I hope you enjoy this cake as much as we did!

RoseCoconut3

2-Layer Rose Coconut Cake

Prep time: 20 minutes | Bake time: 20 minutes | Total active time: 40 minutes

Ingredients:

  • 1 cup all purpose flour
  • 1/2 Tbsp baking powder
  • 1/4 tsp ground cardamom
  • Pinch of salt
  • 3 Tbsp unsalted butter, softened at room temperature
  • 1/2 cup caster sugar
  • 1/2 tsp vanilla extract
  • 1/2 tsp rose extract or 1 Tbsp organic rose water
  • 1 large egg, room temperature
  • 1/2 cup coconut milk, room temperature

Coconut Buttercream Frosting:

  • 1/3 cup unsalted butter, softened at room temperature
  • 4 Tbsp coconut milk, refrigerated
  • 1 cup confectioners sugar
  • Pinch of salt
  • 1/4 tsp rose extract
  • 1/4 tsp coconut extract (optional)

Directions:

  1. Grease 2 6-inch round cake pans with flavourless oil and line the bottom with parchment paper. Preheat the oven at 180°C/350°F.
  2. In a small bowl, sieve all purpose flour, baking powder, ground cardamom and pinch of salt. Give it a whisk.
  3. In another mixing bowl, cream together butter and sugar until light and creamy. Add vanilla extract, rose extract, egg and whisk very well until incorporated.
  4. Now whisk in dry ingredients to wet ingredients alternating with coconut milk in 3 additions, beginning and ending with dry ingredients. Be careful not to overmix.
  5. Divide the batter in to the cake pans and bake for 20 minutes or until toothpick inserted in the center comes out clean. Let it cool on wire rack for about 5 minutes before demoulding. Let the cakes cool completely on wire rack and meanwhile get on the frosting.
  6. Coconut Buttercream Frosting: In a mixing bowl, cream together butter and coconut milk using electric mixer until smooth. With the mixer on low-speed, add confectioners sugar and salt and beat until just combined. Once incorporated, turn up the speed to medium-high and beat until fluffy (about 5 minutes). Adjust the sugar until your desired consistency achieved. Briskly whisk in rose extract and coconut extract (for like 10 seconds).
  7. Assembly: Once the cakes are completely cool, place one layer of the cake onto the serving plate (bottom side up). Spread about 3 Tbsp of frosting on this layer, spread it uniformly and top it with the second layer (bottom side up). Spread about 2 Tbsp of frosting on top, spread uniformly and crumb coat the sides. Let the cake rest in refrigerator for about 15-20 minutes. Frost with the remaining buttercream frosting and decorate as desired. I topped mine with fresh figs and fresh strawberry slices. The cake stays fresh for 4 days, stored in an air-tight container in the refrigerator.


RoseCoconut1

No Churn Strawberry Cheesecake Icecream


strawberry icecrem-2

Hello everyone,

About 30 months ago, I took a break from blogging to pursue my dream of a Master’s degree in London. After returning to India and back to the nitty-gritty of life, the thought of reviving this space has crossed my mind every single day but I have been lazy procrastinating because Instagram made sure that I was still posting pictures, sometimes even recipes; of all the baked goods and smoothies (my new love) being whipped in my kitchen.

So you may ask why now? Well, there are few recipes which absolutely require they be documented because they’re too legendary to be forgotten as a mere Instagram post. They need to be made multiple times to be shared with your loved ones. Turns out I have accumulated tons of such recipes so it’s about time they get the recognition they deserve. Also, I am not a fan of long Instagram posts so I can’t bear my soul to you guys like I can here on the blog (think long future blog posts, not this though). For now nothing has changed around here as I am still clicking my pictures with iPhone (5s now, ancient I know!) and still want to share good food and things with you all. ❤

I posted a picture of this icecream on my Instagram and Facebook page and got so many requests for the recipe so this is the first recipe I chose to blog about. It’s summer and because last of the strawberries are still gracing the market, I don’t want you guys to not make this recipe at least once! This ice cream is THE BEST I have ever made and doesn’t require churning or icecream maker. It stays creamy and ice-free for about 5 days. The sweetest of strawberries give it an intense berry flavour without adding too much flavouring or colour (you could skip both). So get to it now, quick!


strawberry icecrem-3


No Churn Strawberry Cheesecake Icecream

Yields: 1 litre icecream | Serves: 6-8 people

Hands-on time: 20 minutes | Chilling time: 6-8 hours | Total time: 7-9 hours

Ingredients:

  • 1 cup (250 ml) whipping cream, chilled in the refrigerator (not freezer) at least overnight
  • 1 cup (225 gram) cream cheese, softened at room temperature
  • 1 1/4 cup powdered white sugar
  • Pinch salt
  • 1 tsp vanilla extract
  • 1/4 tsp strawberry extract (optional)
  • Couple of drops pink colour (optional)
  • 1 cup finely chopped fresh strawberries
  • Digestive biscuits, to serve

Directions:

  1. Put one large mixing bowl and whisk of your electric mixer in the freezer for at least 30 minutes. In the chilled bowl, add the whipping cream and whip with the electric mixer on medium high speed until the soft peaks form (about 5-7 minutes). Keep it in the refrigerator till you finish next step.
  2. In another large bowl, whisk together cream cheese and powdered sugar until light, creamy and thick. On a low speed, whisk in pinch of salt, vanilla extract, strawberry extract and pink colour for about 30 seconds. Then whisk in strawberry pieces for another 10 seconds.
  3. Slowly fold in whipped cream to the cream cheese mixture and transfer the icecream mixture to loaf pan. Let it set in freezer for about 8 hours at least. Serve it scooped as is or topped with some digestive biscuit crumbs.

Zesty Peaches & Cream Mini Bundt Cake

Zesty Peaches & Cream Mini Bundt Cake1

Hiya.. I hope you all had a wonderful Independence Day long weekend. Ours was relaxed and lazy and juust perfect. Monday was tough indeed. Today was only bearable because I had this cake in my life. First bite into it and I instantly regretted making a mini version because this was over in seconds!! So to save you from regret I suggest you double the following recipe and make 2 mini bundts! 😉

The combination of orange, peach and cream cheese is blow-your-mind-off-amazing! This mini bundt is supremely moist unlike the dry, crumbly pound cakes we all dread. It turns into a piece of heaven drizzled with the vanilla glaze. Isn’t this mini size so cute! Give this a go before the peach season officially ends.

Enjoy & eat it all up! 🙂


Zesty Peaches & Cream Mini Bundt Cake4


Zesty Peaches & Cream Mini Bundt Cake

Yields: 1 6-inch bundt | Serves: 6 | Prep time: 15 minutes | Bake time: 30 minutes | Total time: 45 minutes

Ingredients:
For Cake:
  • 1/4 cup peach cubes (about 1 medium /2 small peaches, peeled & pitted)
  • 1/2 Tbsp all-purpose flour
  • Zest of 1 Naval orange
  • 1/3 cup sugar
  • 1 large egg
  • 1/4 cup unsalted butter, at room temperature
  • 2 Tbsp cream cheese, at room temperature
  • 2 Tbsp freshly squeezed orange juice
  • 1 tsp vanilla extract
  • 1/2 tsp orange extract
  • 1/2 cup all purpose flour, sifted
  • 1/2 tsp baking powder
  • Pinch of salt

For Glaze:

  • 4 Tbsp powdered sugar
  • 1 tsp vanilla extract
  • 1 tsp milk or cream (add more to adjust the consistency)

Directions:

  1. Preheat the oven at 160°C / 325°F. Grease 6-inch mini bundt pan with oil/butter. Set aside.
  2. Put the prepared peach cubes in a bowl. Sprinkle the peach cubes with all purpose flour. Stir lightly, just until peach cubes are coated with the flour.
  3. In a medium mixing bowl, add orange zest and sugar and rub it together with your fingers to release the natural oils from the zest. Add butter and egg to the bowl. Cream together butter, egg, sugar & zest with the whisk or using hand held mixer. Whisk in cream cheese, orange juice, vanilla and orange extract. Slowly and carefully, mix in all purpose flour, baking powder and salt. Do not overmix.
  4. Fold in the prepared peach cubes to the cake batter and pour the batter in the prepared bundt pan. Bake for 26-28 minutes or until the toothpick inserted in the center comes out clean. Let the cake cool in the bundt pan for 5 minutes before inverting on a cooling rack to cool completely.
  5. For glaze: Combine powdered sugar, vanilla extract and milk, adding a teaspoon of milk at a time until glaze reaches desired consistency.


Zesty Peaches & Cream Mini Bundt Cake2

Skinny Summer Popsicles

Skinny Summer Popsicles1
I love popsicles any time of the day. Be it for breakfast, an afternoon snack or dessert. I mean who doesn’t, right?! This one here is so refreshing and healthy without addition of any sugar, be it refined or unrefined. Just some fresh fruit pieces blended along with little bit of fruit juice. It’s a perfect pick-me-up treat using all the gorgeous summer bounty on offer. I bet you can’t stop at just one!
Hope you all are having a great Monday!
xx
Skinny Summer Popsicles
Yields: 4 popsicles | Prep time: 5 minutes | Cook time: 0 | Freeze time: 4-5 hours/overnight
Ingredients:
Puree 1:
  • 6 slices fresh pineapple
  • 1/3 cup pineapple juice (freshly squeezed or packed)
  • Pinch of salt
  • Zest from 1/2 orange
Puree 2:
  • 1/4 cup cherries, pitted
  • 1 medium nectarine, cored
  • 1/2 cup freshly squeezed orange juice (from about 1 orange)
  • Pinch of salt

Directions:

  1. Puree 1: In a blender, blend together pineapple slices, pineapple juice and salt. Stir in orange zest to it and divide the puree among 4 popsicle moulds.
  2. Puree 2: Wash and wipe the blender dry. Add all the ingredients mentioned under puree 2 in a blender and process until smooth. Top the popsicle moulds with puree 2, dividing equally.
  3. Insert stick in the centre of each mould, cover and freeze for about 6-7 hours. To demould, run the moulds under warm running water for 30-50 seconds. Enjoy!

*Recipe can be easily doubled or tripled or quadrupled!


Skinny Summer Popsicles2


Italian Summer Pasta Salad

 Italian Summer Pasta Salad1


After radio silence for 3 weeks, I’m back. Again. Can’t say for how long but I am here. So how are things guys? Here, monsoon has almost arrived and summer is officially over (for good!). But here I am, with a huge backlog of summer recipes. What am I to do when all these days I have been cooking all things “summery” regularly but not getting time to post them. Let’s just say that it is still summer somewhere in the world, right?! 😉

I love anything and everything Italian so when I came across this pretty looking salad on Sommer’s amazing blog I knew I had to get to it pronto. It is so good and SO refreshing! Zests of orange and lemon, al dente pasta, orange chunks, tiny tomatoes and torn basil all tied together with olive oil and Parmesan cheese. What’s not to love? Must try, whatever time of year it is for you.

I hope you’re having an awesome weekend.
Stay cozy, it’s gonna be a rainy one! xx


Italian Summer Pasta Salad3


Italian Summer Pasta Salad

Recipe scaled down & adapted from A Spicy Perspective

Yield: 2-3 servings | Prep time: 15 minutes | Cook time: 15 minutes | Total: 30 minutes

Ingredients:

  • 2 cups whole wheat Farfalle pasta
  • 1 naval orange, zest and orange segments
  • 1 lemon, zest and juice
  • 2 Tbsp extra-virgin olive oil
  • 1 cup grape tomatoes, halved
  • 1/4 cup scallions, cut into 1 inch segments
  • 1/4 cup torn basil leaves
  • 3 Tbsp shaved Parmesan cheese
  • Salt and pepper

Directions:

  1. Place a large pot of salted water over high heat. Bring to a boil and cook the pasta according to package instructions. Drain the pasta and set aside to cool.
  2. Meanwhile, zest the orange and lemon. Place the zest and the juice of lemon in a large bowl. Add the olive oil and whisk. Peel the orange, gently break the segments apart and seed them. Place them in the bowl.
  3. Slice the tomatoes in half and add to the bowl. Then pour the drained pasta over the tomatoes and gently toss to coat. Add the scallions and basil leaves to the bowl and toss. Salt and pepper generously, about 1/2 tsp salt and 1/8 tsp pepper. Refrigerate until ready to serve.

Note: I didn’t have scallions at hand so I had to skip them but they are highly recommended as it’d add some crunch & make the dish all the more flavorsome. 🙂


Italian Summer Pasta Salad2

No Churn Fresh Peach Icecream

No Churn Fresh Peach Icecream2
Celebrating my 29th birthday today with this fresh peach icecream. It is a no churn treat and quite easy to whip up. Making icecream at home takes more time but most of it is not an active time plus all the steps are very easy to follow and the end result makes it totally worth it.
This icecream is a peach lover’s dream with peach chunks in every bite. Peaches cooked with brown sugar lends a caramelized taste to the icecream which I love! It freezes well and is quite easy to scoop too. I photographed it for the blog on the 3rd day of making it and it still scooped perfectly, just like a store-bought or a churned variety!! Plus, it is eggless. So indulge in this perfect summer treat over the weekend.
More update on birthday later!
Happy weekend you all!!
xx
No Churn Fresh Peach Icecream1
No Churn Fresh Peach Icecream
Yields: 2 liters | Prep time: 10 minutes | Cook time: 20 minutes | Chill time: 6-7 hours or overnight | Total time: About 7-8 hours
Ingredients:

  • 6 medium ripe yet firm peach, peeled, pitted and cubed
  • 1/4 cup brown sugar
  • 1 tsp salt
  • 1 Tbsp vanilla extract
  • 1/2 tsp ground cinnamon
  • 1/4 tsp ground nutmeg
  • 1 can (400 gm) sweetened condensed milk
  • 600 ml medium-fat fresh cream (I used 25% fat Milkymist Cream)

Directions:

  1. In a medium saucepan over medium-high heat, combine the peaches, brown sugar and salt. Cook until the peaches have softened and the mixture is thick and jam-like, about 17-20 minutes. Mash with a potato masher, stir in the vanilla, cinnamon, nutmeg and condensed milk, and set aside to cool completely.
  2. With the hand mixer or stand mixer fitted with the whisk attachment, whip the cream until stiff peaks form, about 2-3 minutes. Gently fold the cooled peach mixture into the whipped cream until just combined. Transfer the mixture to two lidded liter containers (Do not pack it tightly). Freeze for at least 6-7 hours before serving.No Churn Fresh Peach Icecream3


Mango Cucumber Salsa

Mango Cucumber Salsa1
Hi! Trying to compensate my absence with back to back posts. I need to blog all the summer recipes I’ve made before the rainy season officially starts and I am really lagging behind. I thought at least I’ll give you this mango salsa recipe before mango season is ends. This salsa is a perfect accompaniment to your chips and a great side to grilled chicken or lamb chops.
I don’t remember how many bowls of this sunshine I have devoured this summer. It is my absolute favorite. I eat chips just so that I can have salsa (or any other dips/condiment for that matter!!) and end up having it by spoonfuls in lieu of chips! I have a couple of peaches sitting in my fridge, waiting to be used up & I most certainly plan of turning them in to this salsa sans cucumber this evening (with mint of course!).
Enjoy& be patient.
Weekend is almost here! 😉
Mango Cucumber Salsa2
Mango Cucumber Salsa:
Serves: 2 | Prep time: 5 minutes | Cook time: 0 minute | Total time: 5 minutes
Ingredients:

  • 1 small red onion, finely chopped
  • 1 jalapeño pepper, seeded & finely chopped
  • 1 cucumber, finely chopped (about 1 cup)
  • 1 ripe mango, sliced, pitted & finely chopped (about 1 1/4 cup)
  • Salt & freshly cracked pepper, to taste
  • 1/4 cup fresh basil, chiffonade (can be subbed with coriander leaves)
  • Juice from 1 lemon

Don’t know what is basil chiffonade? – Pioneer woman tells you here!

Directions:

Toss all of the ingredients in a bowl. Refrigerate until ready to serve (about 3-4 hours max otherwise it turns mushy). Serve with your favorite chips or a meat of choice.

3-Ingredient Watermelon Kiwi Popsicles

3-Ingredient Watermelon Kiwi Popsicles3


Hello lovely people! Let me give you an update on whats been going on in life, you don’t know if you’re not following me on Instagram. It’s been more than 2 weeks since I last posted. Very eventful 2 weeks they were. Hubs & I visited my parent’s house for about 10 days. We celebrated Father’s day, spent some time with my grandmother, met up with couple of school friends after long long time, visited some cool, hip places for meal, watched drama after ages, shopped with my mom & sis, visited beach, bought way too many peach fruits, brushed up on some childhood memories, had an early birthday celebration and consumed liters and liters of Aamras (unsweetened mango pulp) accompanied by some kickass mom-made Gujju food! List is quite long and don’t ask me how I was able to fit ALL of this in my stomach in our such a short stay!!! But it was all too much fun!

I celebrate my 29th birthday this Saturday. I’m freaking out as big 3-0 is approaching and my life in twenties as I know it is going to end. I am excited too ‘coz CAKE!!! Yeah, my brain is confused on how to react to this situation. Anyhoo, Friday can not get here sooooner! It is going to be a funtastic weekend!! 🙂


3-Ingredient Watermelon Kiwi Popsicles1


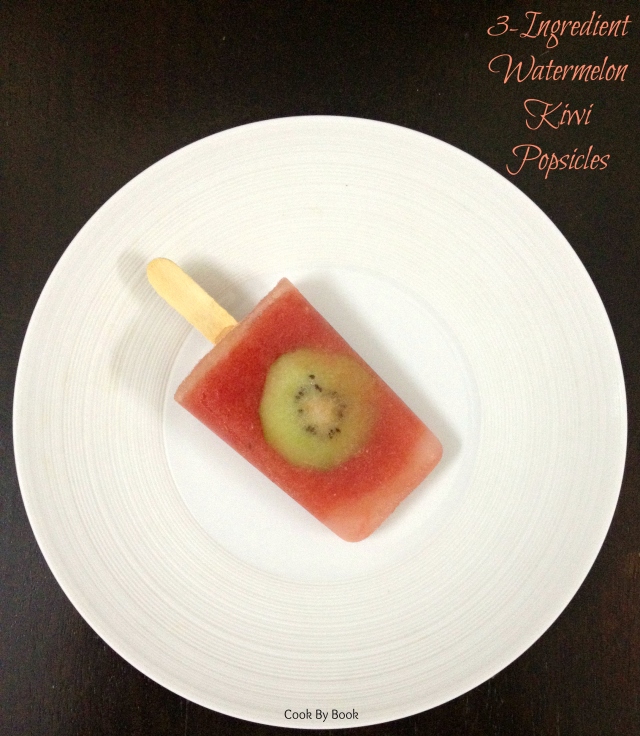
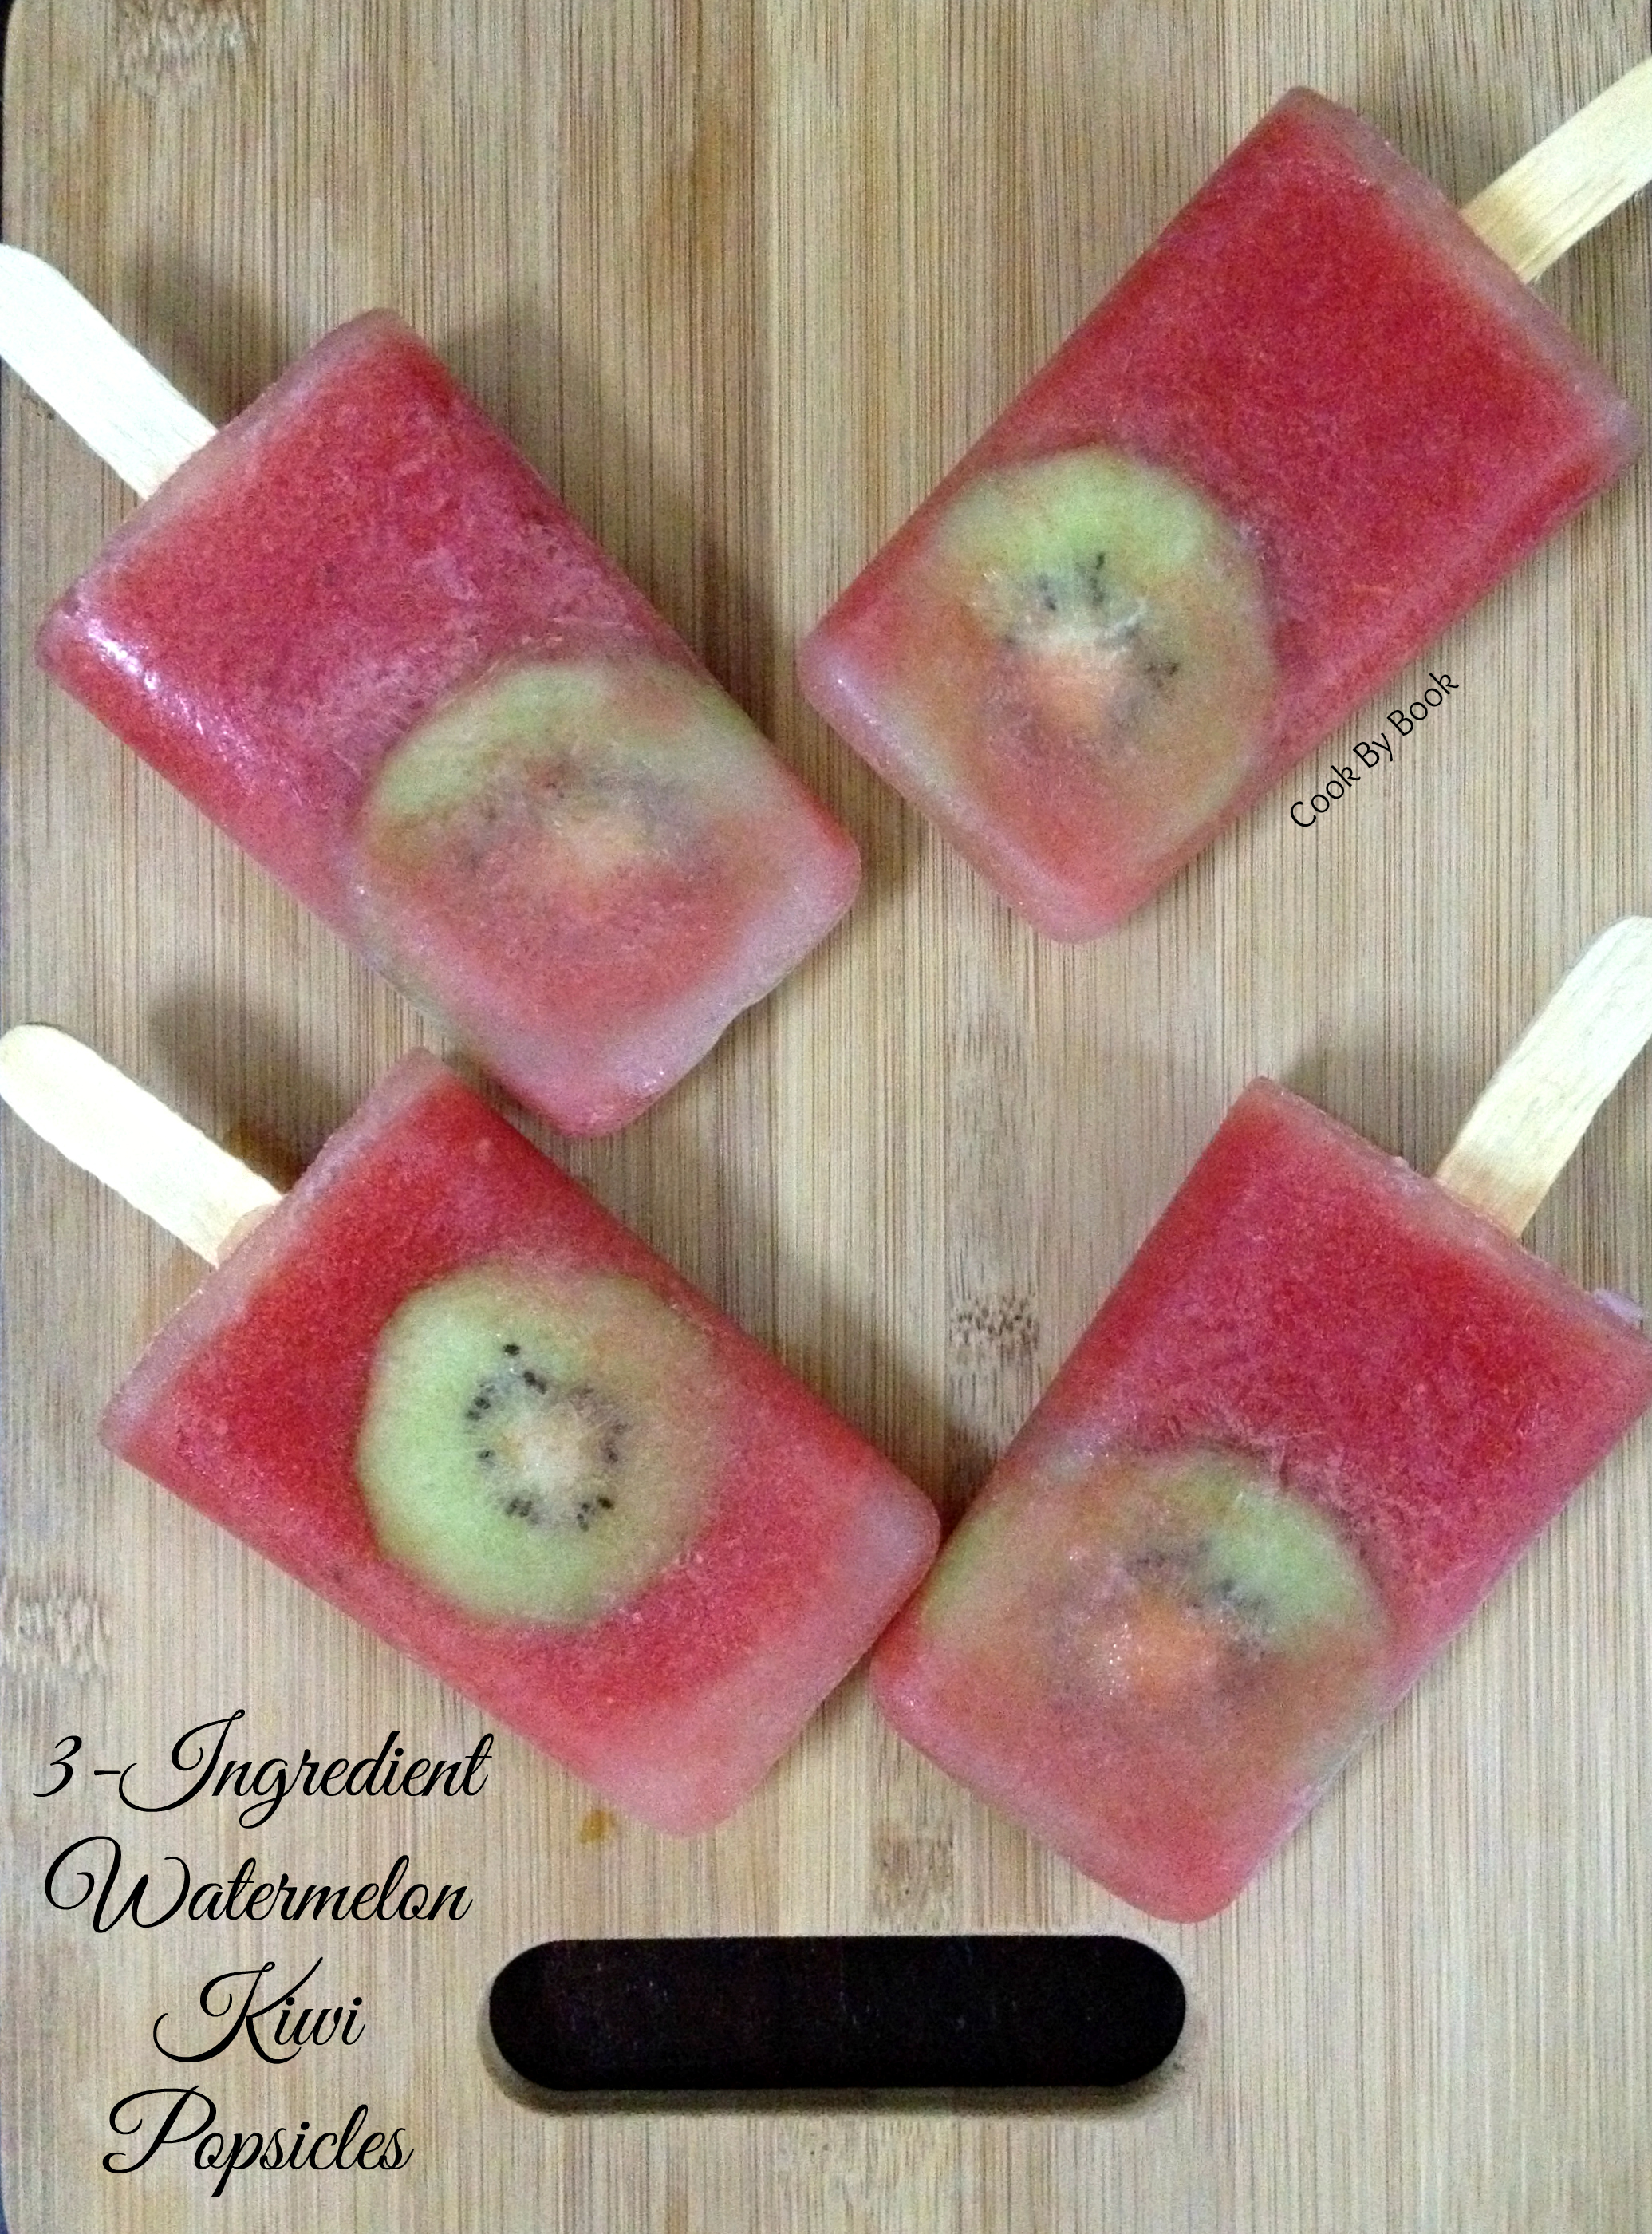
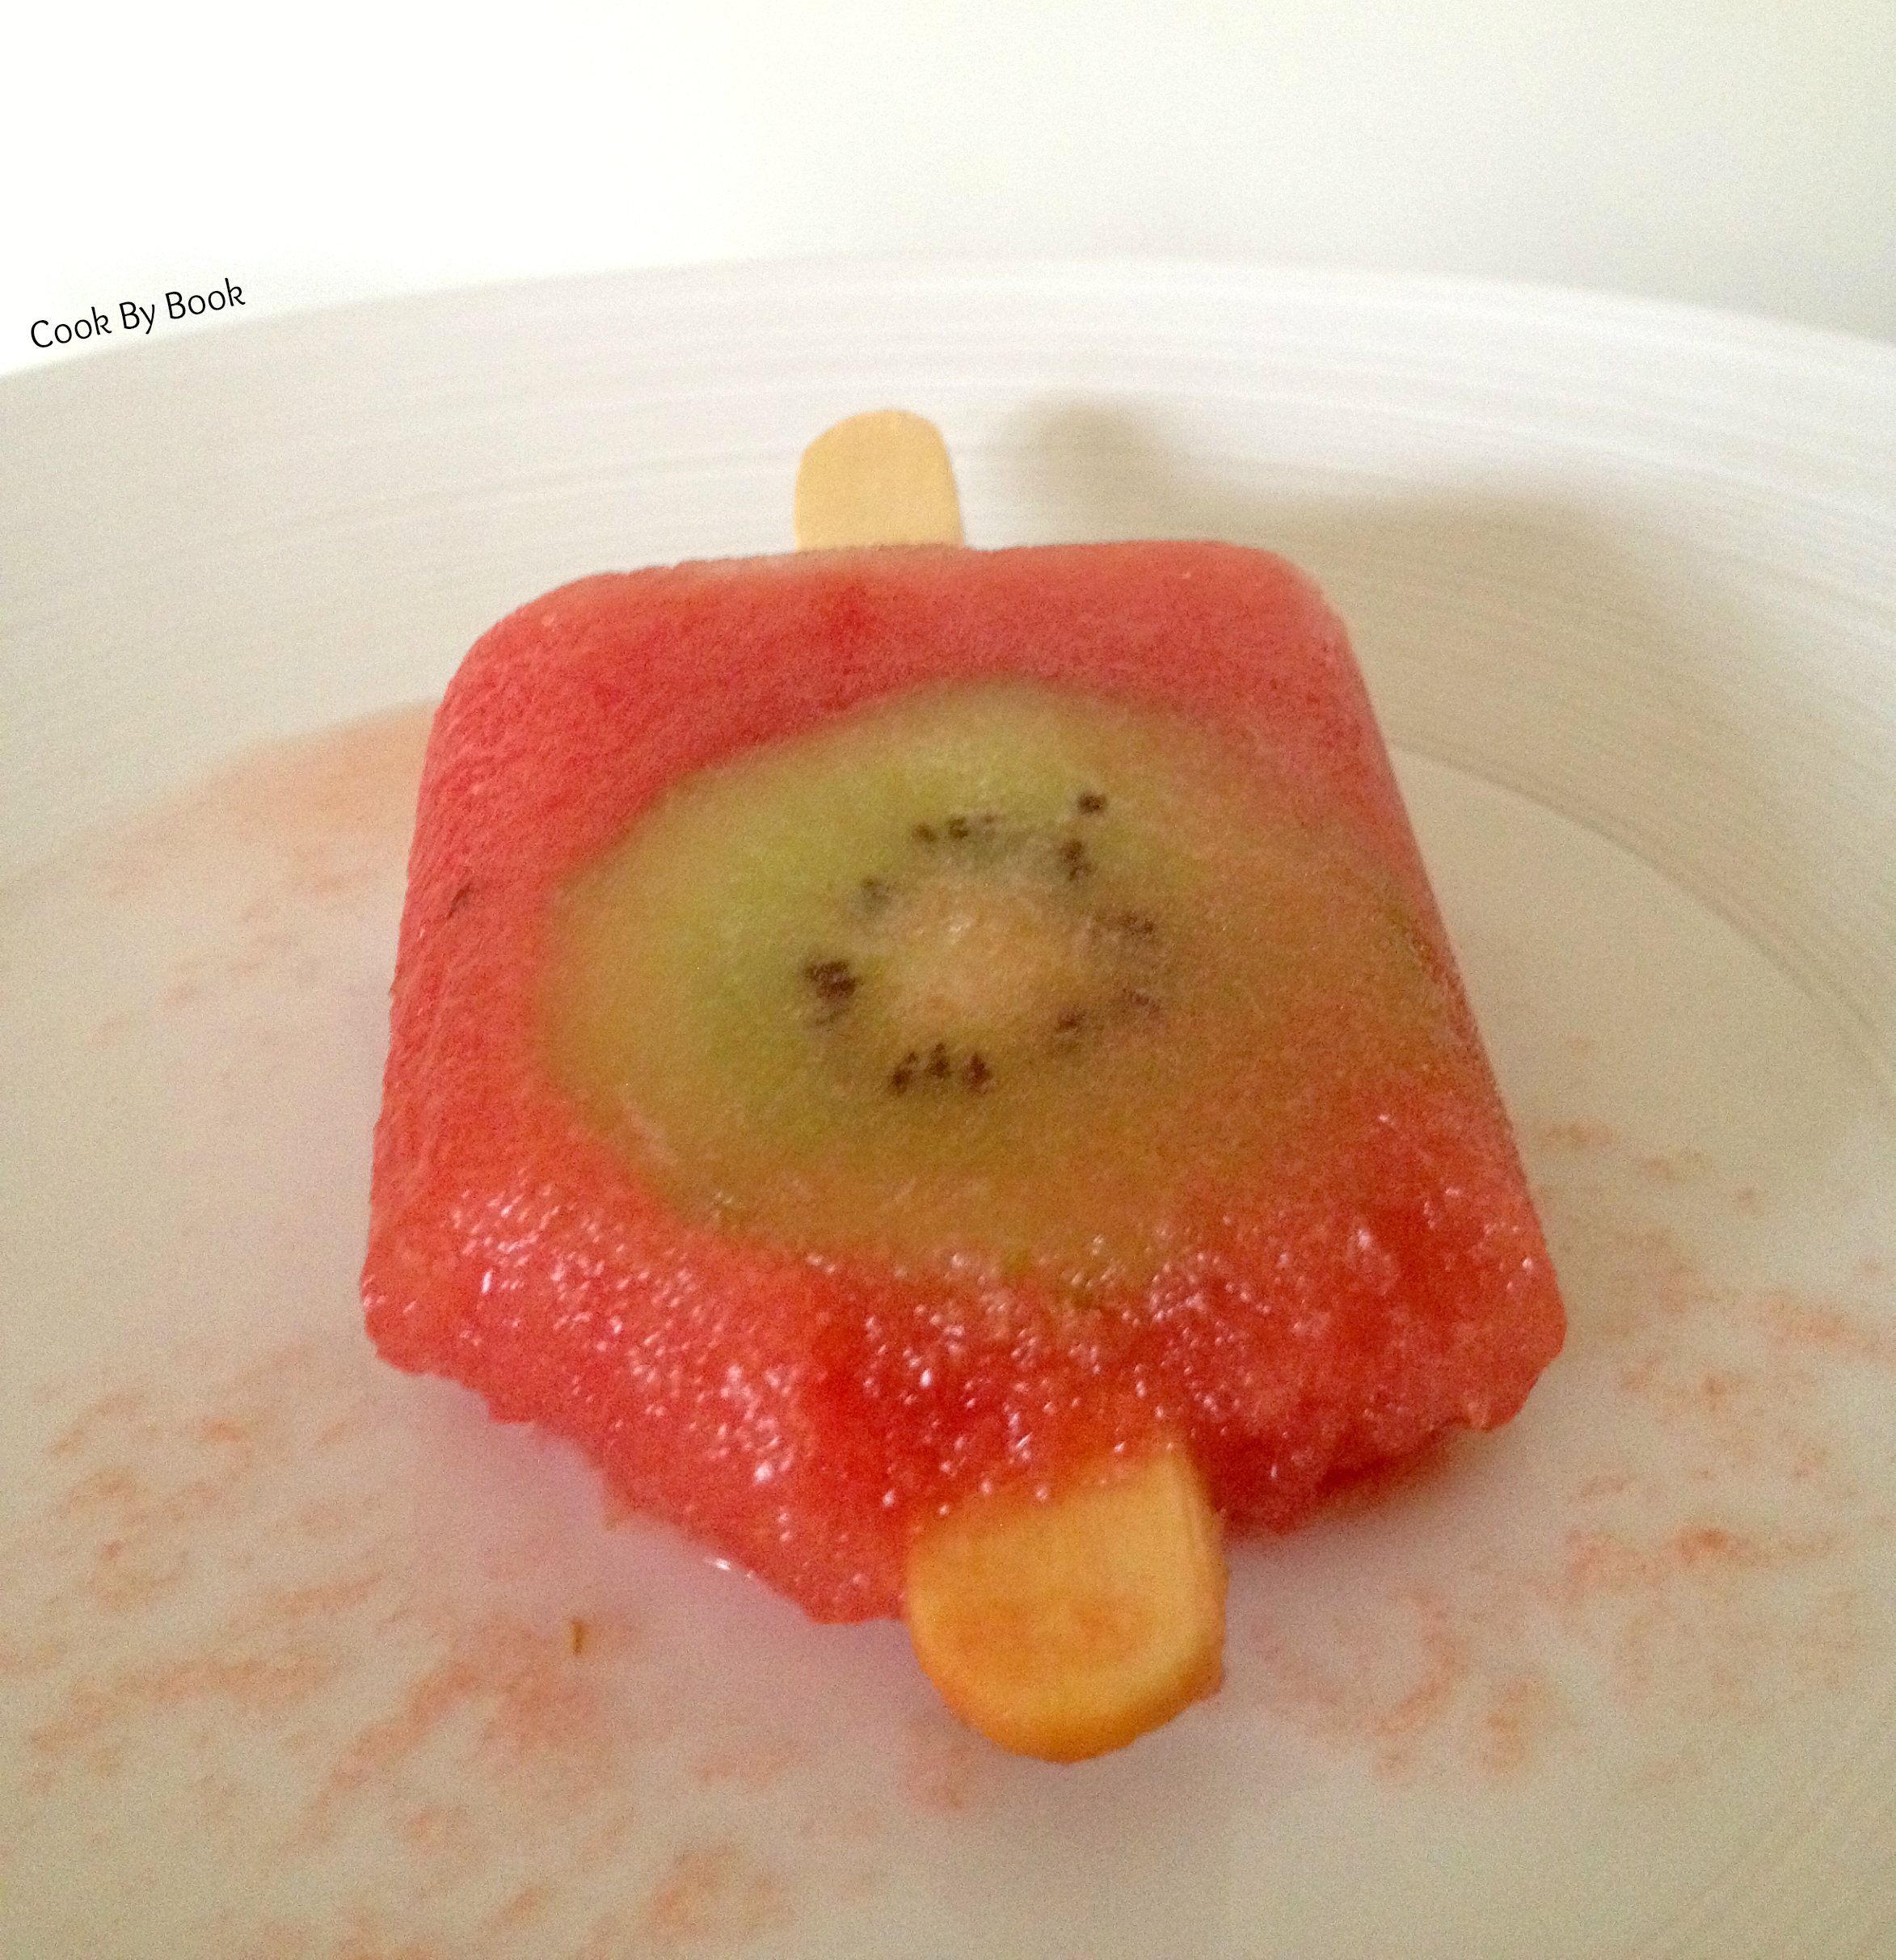
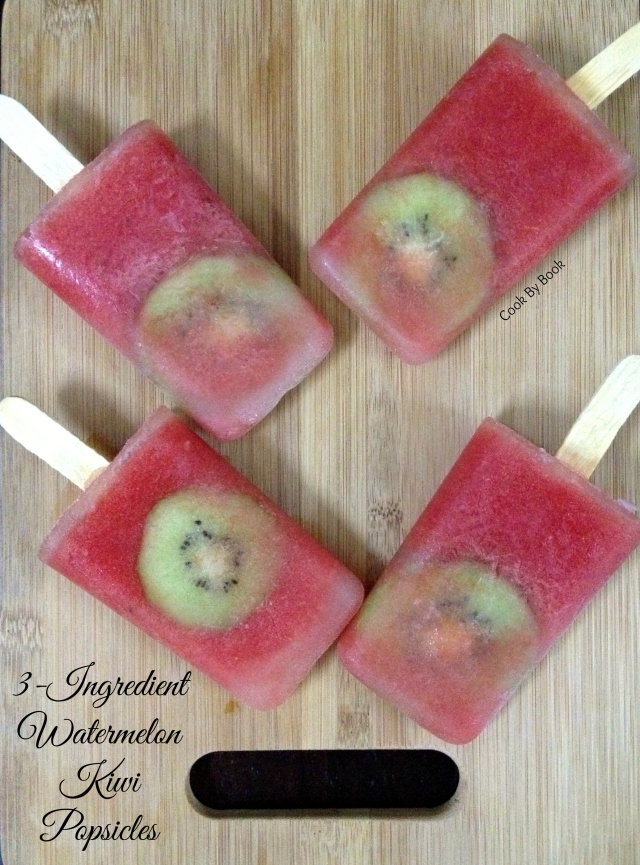
After dealing with unpacking, laundry and a health check before I apply for the Visa, I finally got some time to sit down today. I made these popsicles before we left to visit my parents (more than 3 weeks back). It was so dang hot there, I missed these very very much. I had to constantly drink ice water/tea or eat ice-creams in order to stay cool. These popsicles are child’s play to make with just 3 ingredients and only 2 if you skip kiwi slices (do not skip though!). The watermelon I used was quite sweet so I didn’t have to use any form of sweetener for these popsicles. In case the watermelon you use is not sweet enough, feel free to add a tablespoon of honey or maple syrup or any sweetener of your choice while blending. These are just perfect for breakfast, post-workout snack or dessert.

Happy Hump Day you all! 😀

3-Ingredient Watermelon Kiwi Popsicles

Yields: 4 Popsicles | Prep time: 2 minutes | Chill time: 6-7 hours or overnight

Ingredients:

  • 2 cups watermelon cubes, seeded
  • 1 Tbsp freshly squeezed lemon juice
  • 4 kiwi slices

Directions:

Blend together watermelon and lemon juice in a blender. Slide in kiwi slices in each Popsicle-mould and pour watermelon mixture on top, dividing equally. Insert stick in the centre of each mould, cover and freeze for about 6-7 hours. To demould, run the moulds under warm running water for 30-50 seconds. Dig in immediately!

*Recipe can be easily doubled or tripled or quadrupled!
*For less sweet watermelons, add 1 Tbsp of sweetener of your choice while blending.


3-Ingredient Watermelon Kiwi Popsicles2

National Doughnut Day!!! #RecipeRoundUp

Whether you prefer doughnut over donut or fried over baked doesn’t really matter, because these glazed, filled, sprinkled, and all around glorious treats are uh-mah-zing no matter what you call them or how you make them! In honor of National Doughnut Day today, I’m sharing some of my favorites (which are all of them!) from the archives.

So, take out your donut-pans and get your sweet donut craving on!
Go get baking! 🙂

Baked Lemon Donuts with Lemon Cream Cheese Glaze1

Baked Lemon Doughnuts with Lemon Cream Cheese Glaze

Banana Donuts1

Baked Banana Donuts & Fresh Strawberry Cream Cheese Frosting

Red Velvet Cake Donuts2

Red Velvet Cake Donuts

Baked Cinnamon Sugar Pumpkin Doughnuts2

Baked Cinnamon Sugar Pumpkin Doughnuts

Baked Chocolate Banana Doughnuts1

Baked Chocolate Banana Doughnuts

Baked Apple Cinnamon Doughnuts1

Baked Apple Cinnamon Doughnuts